前言:实验难度再次提升,不过会一个就可以做其他部分,很多都是相同的,个人认为更难的还是配置环境部分,真的会折磨死人
lab3 实验报告
实验要求
- 第一部分: 了解LLVM IR。通过clang生成的.ll,了解LLVM IR与c代码的对应关系。完成1.3
- 第二部分: 了解LightIR。通过助教提供的c++例子,了解LightIR的c++接口及实现。完成2.3
- 第三部分: 理解Visitor Pattern。
- 实验报告:在report.md中回答3个问题。
实验设计
问题1: cpp与.ll的对应
请描述你的cpp代码片段和.ll的每个BasicBlock的对应关系。描述中请附上两者代码。
根据 1.2 gcd例子: 利用clang生成的.ll 进行学习
输入clang -S -emit-llvm gcd_array.c指令:

查看 gcd_array.ll 文件,并输入lli gcd_array.ll; echo $?指令,验证 gcd_array.ll 的正确性:

可以看到,返回结果为18,运行gcd_array.c 查看运行结果:

可以得出其运行后,输出结果也为18。 因此,可以验证 gcd_array.ll 文件正确地对应了 gcd_array.c 文件。
补充assign_hand.ll
查看 assign.c 文件
int main(){


  int a[10];
  a[0] = 10;
  a[1] = a[0] * 2;
  return a[1];
}
很明显运行结果返回20,下面根据上面的测试样例和精简的IR Reference手册,补充补充 assign_hand.ll
; ModuleID = 'assign.c'
source_filename = "assign.c"
; target的开始
target datalayout = "e-m:e-p270:32:32-p271:32:32-p272:64:64-i64:64-f80:128-n8:16:32:64-S128"
target triple = "x86_64-pc-linux-gnu"
;target的结束

; 全局main函数的定义
define dso_local i32 @main() #0{
	;第一个基本块的开始
	;语句:int a[10];创建空间,并返回指针
	%1 = alloca [10 x i32]

	;语句:a[0] = 10;获取a[0]指针
	%2 = getelementptr inbounds [10 x i32], [10 x i32]* %1, i64 0, i64 0
	; 将10存入a[0]中
	store i32 10, i32* %2

	;语句:a[1] = a[0] * 2;
	%3 = load i32, i32* %2	; 取出a[0],存到%3中
	%4 = mul i32 %3, 2		; 将值乘以2,存在%4中
	%5 = getelementptr inbounds [10 x i32], [10 x i32]* %1, i64 0, i64 1	;获取a[1]指针
	store i32 %4, i32* %5	; 写入a[1]中

	; 语句:return a[1]
	ret i32 %4				; 将a[0]返回
}
结果验证:
运行assign.c ,输入命令:gcc -o assign assign.c 和./assign;echo $?,结果如下:

运行刚才补充的assign_hand.ll ,输入命令lli assign_hand.ll; echo $? ,运行结果如下:

可以看到,结果一样,都为20,说明补充正确。assign_hand.ll文件正确地对应了 assign.c 文件。
补充fun_hand.ll
查看 fun.c 文件
int callee(int a){


  return 2 * a;
}
int main(){


  return callee(110);
}
很明显运行结果返回220,下面根据上面的测试样例和精简的IR Reference手册,补充补充 fun_hand.ll
; ModuleID = 'fun.c'
source_filename = "fun.c"
; target的开始
target datalayout = "e-m:e-p270:32:32-p271:32:32-p272:64:64-i64:64-f80:128-n8:16:32:64-S128"
target triple = "x86_64-pc-linux-gnu"
;target的结束

; 语句:int callee(int a)。callee 函数的定义
define dso_local i32 @callee(i32) #0{


    ; 语句:return 2 * a
    %2 = mul i32 %0, 2		; 将参数%0乘以2存入%2中
	ret i32 %2				; 返回%2
}

; main 函数的定义
define dso_local i32 @main() #0{


    ; 语句:return callee(110);
	%1 = call i32 @callee(i32 110)	; 调用函数callee,并将结果存到%1中
	ret i32 %1					; 返回%1
}
结果验证:
运行fun.c ,输入命令:gcc -o fun fun.c 和./fun;echo $?,结果如下:

运行刚才补充的fun_hand.ll ,输入命令lli fun_hand.ll; echo $? ,运行结果如下:

这里有一些要注意的地方。第一点是对callee函数定义时define dso_local i32 @callee(i32)传入的参数如果只有一个int型,可以直接传入i32,默认传入参数为%0,如果写的是i32 %0会报错,初步认为应该和llvm版本有关。
第二点就是 %2 = mul i32 %0, 2这一条语句,为什么不能用%1进行赋值,会报错

程序也会建议使用%2赋值
补充if_hand.ll
查看 fun.c 文件
int main(){


  float a = 5.555;
  if(a > 1)
    return 233;
  return 0;
}
很明显运行结果返回233,下面根据上面的测试样例和精简的IR Reference手册,补充补充 fun_hand.ll
; ModuleID = 'if.c'
source_filename = "if.c"
; target的开始
target datalayout = "e-m:e-p270:32:32-p271:32:32-p272:64:64-i64:64-f80:128-n8:16:32:64-S128"
target triple = "x86_64-pc-linux-gnu"
;target的结束

; main 函数的定义
define dso_local i32 @main() #0{


	;语句:; float a = 5.555;
	%1 = alloca float      ;为a开辟栈空间
	store float 0x40163851E0000000, float* %1  ;将浮点数5.555写入a指向的内存空间

	; 语句:if(a > 1)
	%2 = load float, float* %1		; 取出%1所指向的空间中的值赋给%2
	%3 = fcmp ugt float %2, 1.000	; 将其和1进行比较,返回结果到%3中,是布尔型
	br i1 %3, label %lebel_1, label %lebel_2	; 如果%3为1,则跳转到%4,否则跳转到%5

lebel_1:	; 语句:return 233;
	ret i32 233		; 返回233

lebel_2:	; 语句:return 0;
	ret i32 0		; 返回0
}
结果验证:
运行if.c ,输入命令:gcc -o if if.c 和./if;echo $?,结果如下:

运行刚才补充的if_hand.ll ,输入命令lli if_hand.ll; echo $? ,运行结果如下:

这里有一个难点就是给float a = 5.555;赋值。如果直接使用store float 5.555, float* %1会报错。 输入clang -S -emit-llvm if.c指令,看了一下样例,发现要写成浮点数的机器表达形式。 即
5.555的二进制表示:101.10001110000101000111101011100001010001111010111
尾数正规化 :1.0110001110000101000111101011100001010001111010111*22
E=2, exp = E + Bias =129,二进制表示为10000001
符号位为0
有效数字M等于 01100011100001010001111
故5.555的IEEE表示为
0 10000001 01100011100001010001111
转换为十六进制为0x40b1c28f
但样例给出的是0x40163851E0000000,后经验证发现样例给的是double型的IEEE标识,但程序和精简的IR Reference手册都说明了float是单精度的,所以我觉得这里还是有点问题
补充while.ll
查看 while.c 文件
int main(){


  int a;
  int i;
  a = 10;
  i = 0;
  while(i < 10){


    i = i + 1;
    a = a + i;
  }
  return a;
}
很明显运行结果返回65,下面根据上面的测试样例和精简的IR Reference手册,补充补充 fun_hand.ll
; ModuleID = 'if.c'
source_filename = "if.c"
; target的开始
target datalayout = "e-m:e-p270:32:32-p271:32:32-p272:64:64-i64:64-f80:128-n8:16:32:64-S128"
target triple = "x86_64-pc-linux-gnu"
;target的结束

; main 函数的定义
define dso_local i32 @main() #0{


	;为变量a和i开辟栈空间
	%1=alloca i32
	%2=alloca i32
	;将10和0写入a和i指向的内存空间
	store i32 10,i32* %1
	store i32 0,i32* %2
	;跳到while条件判断中
	br label %label_1

;i < 10
label_1:
	;取出i的值赋给%3
	%3=load i32, i32* %2
	;将i和10进行比较,得到的结果为布尔型赋给%4
	%4 = icmp ult i32 %3, 10
	;如果%4为1跳到label_2,否则跳到%label_3
	br i1 %4,label %label_2,label %label_3

;循环体的内容
label_2:
	;i=i+1
	%5=add i32 %3 , 1
	store i32 %5,i32* %2
	;a=a+1,先取出a的值再相加再存回a里
	%6=load i32,i32* %1
	%7=add i32 %6,%5
	store i32 %7,i32* %1
	;跳回条件判断
	br label %label_1
;return a
label_3:
	;取出a的值
	%8=load i32,i32* %1
	;返回a
	ret i32 %8
}
结果验证:
运行while.c ,输入命令:gcc -o while while.c 和./while;echo $?,结果如下:

运行刚才补充的while_hand.ll ,输入命令lli while_hand.ll; echo $? ,运行结果如下:

补充assign_generator.cpp
首先查看样例gcd_array_generator.cpp
#include "BasicBlock.h"
#include "Constant.h"
#include "Function.h"
#include "IRBuilder.h"
#include "Module.h"
#include "Type.h"

#include <iostream>
#include <memory>

#ifdef DEBUG  // 用于调试信息,大家可以在编译过程中通过" -DDEBUG"来开启这一选项
#define DEBUG_OUTPUT std::cout << __LINE__ << std::endl;  // 输出行号的简单示例
#else
#define DEBUG_OUTPUT
#endif

#define CONST_INT(num) \
    ConstantInt::get(num, module)

#define CONST_FP(num) \
    ConstantFP::get(num, module) // 得到常数值的表示,方便后面多次用到

int main() {
  auto module = new Module("Cminus code");  // module name是什么无关紧要
  auto builder = new IRBuilder(nullptr, module);
  Type *Int32Type = Type::get_int32_type(module);

  // 全局数组,x,y
  auto *arrayType = ArrayType::get(Int32Type, 1);
  auto initializer = ConstantZero::get(Int32Type, module);
  auto x = GlobalVariable::create("x", module, arrayType, false, initializer);// 参数解释:  名字name,所属module,全局变量类型type,
  auto y = GlobalVariable::create("y", module, arrayType, false, initializer);//          是否是常量定义(cminus中没有常量概念,应全都是false),初始化常量(ConstantZero类)

  // gcd函数
  // 函数参数类型的vector
  std::vector<Type *> Ints(2, Int32Type);

  //通过返回值类型与参数类型列表得到函数类型
  auto gcdFunTy = FunctionType::get(Int32Type, Ints);

  // 由函数类型得到函数
  auto gcdFun = Function::create(gcdFunTy,
                                 "gcd", module);

  // BB的名字在生成中无所谓,但是可以方便阅读
  auto bb = BasicBlock::create(module, "entry", gcdFun);

  builder->set_insert_point(bb);                        // 一个BB的开始,将当前插入指令点的位置设在bb

  auto retAlloca = builder->create_alloca(Int32Type);   // 在内存中分配返回值的位置
  auto uAlloca = builder->create_alloca(Int32Type);     // 在内存中分配参数u的位置
  auto vAlloca = builder->create_alloca(Int32Type);     // 在内存中分配参数v的位置

  std::vector<Value *> args;  // 获取gcd函数的形参,通过Function中的iterator
  for (auto arg = gcdFun->arg_begin(); arg != gcdFun->arg_end(); arg++) {
    args.push_back(*arg);   // * 号运算符是从迭代器中取出迭代器当前指向的元素
  }

  builder->create_store(args[0], uAlloca);  // 将参数u store下来
  builder->create_store(args[1], vAlloca);  // 将参数v store下来

  auto vLoad = builder->create_load(vAlloca);           // 将参数v load上来
  auto icmp = builder->create_icmp_eq(vLoad, CONST_INT(0));  // v和0的比较,注意ICMPEQ

  auto trueBB = BasicBlock::create(module, "trueBB", gcdFun);    // true分支
  auto falseBB = BasicBlock::create(module, "falseBB", gcdFun);  // false分支
  auto retBB = BasicBlock::create(
      module, "", gcdFun);  // return分支,提前create,以便true分支可以br

  auto br = builder->create_cond_br(icmp, trueBB, falseBB);  // 条件BR
  DEBUG_OUTPUT // 我调试的时候故意留下来的,以醒目地提醒你这个调试用的宏定义方法
  builder->set_insert_point(trueBB);  // if true; 分支的开始需要SetInsertPoint设置
  auto uLoad = builder->create_load(uAlloca);
  builder->create_store(uLoad, retAlloca);
  builder->create_br(retBB);  // br retBB

  builder->set_insert_point(falseBB);  // if false
  uLoad = builder->create_load(uAlloca);
  vLoad = builder->create_load(vAlloca);
  auto div = builder->create_isdiv(uLoad, vLoad);  // SDIV - div with S flag
  auto mul = builder->create_imul(div, vLoad);  // MUL - mul
  auto sub = builder->create_isub(uLoad, mul);  // the same
  auto call = builder->create_call(gcdFun, {vLoad, sub}); // 创建call指令
  // {vLoad, sub} - 参数array
  builder->create_store(call, retAlloca);
  builder->create_br(retBB);  // br retBB

  builder->set_insert_point(retBB);  // ret分支
  auto retLoad = builder->create_load(retAlloca);
  builder->create_ret(retLoad);

  // funArray函数
  auto Int32PtrType = Type::get_int32_ptr_type(module);   // 单个参数的类型,指针
  std::vector<Type *> IntPtrs(2, Int32PtrType);           // 参数列表类型
  auto funArrayFunType = FunctionType::get(Int32Type, IntPtrs);   // 函数类型
  auto funArrayFun = Function::create(funArrayFunType, "funArray", module);
  bb = BasicBlock::create(module, "entry", funArrayFun);
  builder->set_insert_point(bb);
  auto upAlloca = builder->create_alloca(Int32PtrType);   // u的存放
  auto vpAlloca = builder->create_alloca(Int32PtrType);   // v的存放
  auto aAlloca = builder->create_alloca(Int32Type);       // a的存放
  auto bAlloca = builder->create_alloca(Int32Type);       // b的存放
  auto tempAlloca = builder->create_alloca(Int32Type);    // temp的存放

  std::vector<Value *> args1;  //获取funArrayFun函数的形参,通过Function中的iterator
  for (auto arg = funArrayFun->arg_begin(); arg != funArrayFun->arg_end(); arg++) {
    args1.push_back(*arg); // * 号运算符是从迭代器中取出迭代器当前指向的元素
  }
  builder->create_store(args1[0], upAlloca);              // 将参数u store下来
  builder->create_store(args1[1], vpAlloca);              // 将参数v store下来

  auto u0pLoad = builder->create_load(upAlloca);          // 读取u
  auto u0GEP = builder->create_gep(u0pLoad, {CONST_INT(0)});  // GEP: 获取u[0]地址
  auto u0Load = builder->create_load(u0GEP);              // 从u[0]地址 读取u[0]
  builder->create_store(u0Load, aAlloca);                 // 将u[0] 写入 a
  auto v0pLoad = builder->create_load(vpAlloca);          // 同上
  auto v0GEP = builder->create_gep(v0pLoad, {CONST_INT(0)});
  auto v0Load = builder->create_load(v0GEP);
  builder->create_store(v0Load, bAlloca);

  auto aLoad = builder->create_load(aAlloca);
  auto bLoad = builder->create_load(bAlloca);
  icmp = builder->create_icmp_lt(aLoad, bLoad);
  trueBB = BasicBlock::create(module, "trueBB", funArrayFun);
  falseBB = BasicBlock::create(module, "falseBB", funArrayFun);
  builder->create_cond_br(icmp, trueBB, falseBB);

  builder->set_insert_point(trueBB);
  builder->create_store(aLoad, tempAlloca);
  builder->create_store(bLoad, aAlloca);
  auto tempLoad = builder->create_load(tempAlloca);
  builder->create_store(tempLoad, bAlloca);
  builder->create_br(falseBB);  // 注意在下一个BB之前要Br一下

  builder->set_insert_point(falseBB);
  aLoad = builder->create_load(aAlloca);
  bLoad = builder->create_load(bAlloca);
  call = builder->create_call(gcdFun, {aLoad, bLoad});
  builder->create_ret(call);


  // main函数
  auto mainFun = Function::create(FunctionType::get(Int32Type, {}),
                                  "main", module);
  bb = BasicBlock::create(module, "entry", mainFun);
  // BasicBlock的名字在生成中无所谓,但是可以方便阅读
  builder->set_insert_point(bb);

  retAlloca = builder->create_alloca(Int32Type);
  builder->create_store(CONST_INT(0), retAlloca);             // 默认 ret 0

  auto x0GEP = builder->create_gep(x, {CONST_INT(0), CONST_INT(0)});  // GEP: 这里为什么是{0, 0}呢? (实验报告相关)
  builder->create_store(CONST_INT(90), x0GEP);
  auto y0GEP = builder->create_gep(y, {CONST_INT(0), CONST_INT(0)});  // GEP: 这里为什么是{0, 0}呢? (实验报告相关)
  builder->create_store(CONST_INT(18), y0GEP);

  x0GEP = builder->create_gep(x, {CONST_INT(0), CONST_INT(0)});
  y0GEP = builder->create_gep(y, {CONST_INT(0), CONST_INT(0)});
  call = builder->create_call(funArrayFun, {x0GEP, y0GEP});           // 为什么这里传的是{x0GEP, y0GEP}呢?

  builder->create_ret(call);
  // 给这么多注释了,但是可能你们还是会弄很多bug
  // 所以强烈建议配置AutoComplete,效率会大大提高!
  // 别人配了AutoComplete,只花1小时coding
  // 你没有配AutoComplete,找method花5小时,debug花5小时,肯定哭唧唧!
  // 最后,如果猜不到某个IR指令对应的C++的函数,建议把指令翻译成英语然后在method列表中搜索一下
  // 最后的最后,这个例子只涉及到了一点基本的指令生成,
  // 对于额外的指令,包括数组,在之后的实验中可能需要大家好好搜索一下思考一下,
  // 还有涉及到的C++语法,可以在gitlab上发issue提问或者向大家提供指导,会有bonus哦!
  // 对于这个例子里的代码风格/用法,如果有好的建议也欢迎提出!
  std::cout << module->print();
  delete module;
  return 0;
}
按照gcd_array_generator.cpp来补充assign_generator.cpp
#include "BasicBlock.h"
#include "Constant.h"
#include "Function.h"
#include "IRBuilder.h"
#include "Module.h"
#include "Type.h"

#include <iostream>
#include <memory>

#ifdef DEBUG  // 用于调试信息,大家可以在编译过程中通过" -DDEBUG"来开启这一选项
#define DEBUG_OUTPUT std::cout << __LINE__ << std::endl;  // 输出行号的简单示例
#else
#define DEBUG_OUTPUT
#endif

#define CONST_INT(num) \
    ConstantInt::get(num, module)

#define CONST_FP(num) \
    ConstantFP::get(num, module) // 得到常数值的表示,方便后面多次用到

int main(){
	auto module = new Module("Cminus code");  // module name是什么无关紧要
	auto builder = new IRBuilder(nullptr, module);      // 创建IRBuilder,该类提供了独立的接口创建各种 IR 指令
	Type* Int32Type = Type::get_int32_type(module);

	// main函数
	auto mainFun = Function::create(FunctionType::get(Int32Type, {}),   /* 创建 main 函数 */
	auto bb = BasicBlock::create(module, "entry", mainFun);
    builder->set_insert_point(bb);

    auto retAlloca = builder->create_alloca(Int32Type);  //分配一个保存返回值的内容

    auto *arrayType = ArrayType::get(Int32Type, 10);  //数组类型,参数依次是数组元素的类型Int32Type,数组元素个数10
    auto a=builder->create_alloca(arrayType);  //数组a[10]

    auto a0GEP = builder->create_gep(a, {CONST_INT(0), CONST_INT(0)}); //获取a[0]的地址
    builder->create_store(CONST_INT(10), a0GEP);  //将整数10写入a[0]的地址
    auto a0Load = builder->create_load(a0GEP);  //读取a[0]
    auto m=builder->create_imul(a0Load,CONST_INT(2)); //a[0]*2

    auto a1GEP = builder->create_gep(a, {CONST_INT(0), CONST_INT(1)});  //获取a[1]的地址
    builder->create_store(m, a1GEP); //将a[0]*2写入a[1]的地址
    auto a1Load = builder->create_load(a1GEP); //获取a[1]的值

    builder->create_store(a1Load, retAlloca); //将a[1]的值写入retAlloca地址中
    auto retLoad=builder->create_load(retAlloca); //读取retAlloca地址的值
    builder->create_ret(retLoad);  //创建ret指令,即返回

    std::cout << module->print();
    delete module;
    return 0;
}
结果验证:
输入指令make,编译通过后输入指令./stu_assign_generator>assign.ll:

assign.ll结果如下:
define i32 @main() {


label_entry:
  %op0 = alloca i32
  %op1 = alloca [10 x i32]
  %op2 = getelementptr [10 x i32], [10 x i32]* %op1, i32 0, i32 0
  store i32 10, i32* %op2
  %op3 = load i32, i32* %op2
  %op4 = mul i32 %op3, 2
  %op5 = getelementptr [10 x i32], [10 x i32]* %op1, i32 0, i32 1
  store i32 %op4, i32* %op5
  %op6 = load i32, i32* %op5
  store i32 %op6, i32* %op0
  %op7 = load i32, i32* %op0
  ret i32 %op7
}
输入 lli assign.ll; echo $?指令进行测试,结果如下:

输出结果为 20,结果正确。
只有一个basicblock,对应关系为:
auto bb = BasicBlock::create(module, "entry", mainFun);创建名为entry的基本块,并将其存到变量bb中,对应.ll文件中的label_entry块
补充fun_generator.cpp
fun_generator.cpp 代码如下:
#include "BasicBlock.h"
#include "Constant.h"
#include "Function.h"
#include "IRBuilder.h"
#include "Module.h"
#include "Type.h"

#include <iostream>
#include <memory>

#ifdef DEBUG  // 用于调试信息,大家可以在编译过程中通过" -DDEBUG"来开启这一选项
#define DEBUG_OUTPUT std::cout << __LINE__ << std::endl;  // 输出行号的简单示例
#else
#define DEBUG_OUTPUT
#endif

#define CONST_INT(num) \
    ConstantInt::get(num, module)

#define CONST_FP(num) \
    ConstantFP::get(num, module) // 得到常数值的表示,方便后面多次用到
int main() {
  auto module = new Module("fun code");
  auto builder = new IRBuilder(nullptr, module); //该类提供了独立的接口创建各种 IR 指令
  Type *Int32Type = Type::get_int32_type(module);

  //函数callee
  std::vector<Type *> Ints(1, Int32Type); // 函数参数类型的vector
  auto calleeFunTy = FunctionType::get(Int32Type, Ints); //通过返回值类型与参数类型列表得到函数类型
  auto calleeFun = Function::create(calleeFunTy,"callee", module);   // 由函数类型得到函数

  auto bb = BasicBlock::create(module, "entry", calleeFun);
  builder->set_insert_point(bb);                 // 一个BB的开始,将当前插入指令点的位置设在bb

  auto aAlloca = builder->create_alloca(Int32Type);  // 在内存中分配参数a的位置

  std::vector<Value *> args;  // 获取函数的形参,通过Function中的iterator
  for (auto arg = calleeFun->arg_begin(); arg != calleeFun->arg_end(); arg++) {
    args.push_back(*arg);   // * 号运算符是从迭代器中取出迭代器当前指向的元素
  }
  builder->create_store(args[0], aAlloca);  // 将参数a store下来
  auto aLoad=builder->create_load(aAlloca); //获取参数a的值
  auto m=builder->create_imul(aLoad,CONST_INT(2)); //a*2

  auto retAlloca = builder->create_alloca(Int32Type);  //分配一个保存返回值的内容
  builder->create_store(m, retAlloca); //将m的值写入retAlloca地址中
  auto retLoad=builder->create_load(retAlloca); //读取retAlloca地址的值
  builder->create_ret(retLoad);  //创建ret指令,即返回

  // main函数
  auto mainFun = Function::create(FunctionType::get(Int32Type, {}),"main", module);
  bb = BasicBlock::create(module, "entry", mainFun); //创建BasicBlock
  builder->set_insert_point(bb);  //将当前插入指令点的位置设在bb

  auto cs= builder->create_alloca(Int32Type); // 在内存中分配参数cs的位置
  builder->create_store(CONST_INT(110), cs);  //将整数10写入cs的地址
  auto csLoad = builder->create_load(cs);  //读取cs
  auto call = builder->create_call(calleeFun, {csLoad}); //创建call指令
  builder->create_ret(call); //创建ret指令,返回

  std::cout << module->print();
  delete module;
  return 0;
}
结果验证:
输入指令make,编译通过后输入指令./stu_fun_generator >fun.ll:
内容如下:
define i32 @callee(i32 %arg0) {


label_entry:
  %op1 = alloca i32
  store i32 %arg0, i32* %op1
  %op2 = load i32, i32* %op1
  %op3 = mul i32 %op2, 2
  %op4 = alloca i32
  store i32 %op3, i32* %op4
  %op5 = load i32, i32* %op4
  ret i32 %op5
}
define i32 @main() {


label_entry:
  %op0 = alloca i32
  store i32 110, i32* %op0
  %op1 = load i32, i32* %op0
  %op2 = call i32 @callee(i32 %op1)
  ret i32 %op2
}
输入 lli fun.ll; echo $?指令进行测试,结果如下:

结果为220,输出正确
创建了两个块,分别为 auto bb = BasicBlock::create(module, "entry", calleeFun); 和 bb = BasicBlock::create(module, "entry", mainFun); ,其分别对应.ll文件中 callee 函数中的标签label_entry和main函数中的标签label_entry。
补充if_generator.cpp
if_generator.cpp代码如下:
#include "BasicBlock.h"
#include "Constant.h"
#include "Function.h"
#include "IRBuilder.h"
#include "Module.h"
#include "Type.h"

#include <iostream>
#include <memory>

#ifdef DEBUG  // 用于调试信息,大家可以在编译过程中通过" -DDEBUG"来开启这一选项
#define DEBUG_OUTPUT std::cout << __LINE__ << std::endl;  // 输出行号的简单示例
#else
#define DEBUG_OUTPUT
#endif

#define CONST_INT(num) \
    ConstantInt::get(num, module)

#define CONST_FP(num) \
    ConstantFP::get(num, module) // 得到常数值的表示,方便后面多次用到

int main() {
  auto module = new Module("if code");
  auto builder = new IRBuilder(nullptr, module); //该类提供了独立的接口创建各种 IR 指令
  Type *Int32Type = Type::get_int32_type(module);
  Type *FloatType = Type::get_float_type(module);

  // main函数
  auto mainFun = Function::create(FunctionType::get(Int32Type, {}),"main", module);
  auto bb = BasicBlock::create(module, "entry", mainFun); //创建BasicBlock
  builder->set_insert_point(bb);  //将当前插入指令点的位置设在bb

  auto retAlloca = builder->create_alloca(Int32Type);   // 在内存中分配返回值的位置

  auto aAlloca=builder->create_alloca(FloatType); //在内存中分配参数a的位置
  builder->create_store(CONST_FP(5.555), aAlloca);  //将常数5.555写入a的地址
  auto aLoad = builder->create_load(aAlloca);  //读取a

  auto cmp = builder->create_fcmp_gt(aLoad, CONST_FP(1.000));  //判断a是否大于1
  auto trueBB = BasicBlock::create(module, "trueBB", mainFun);    // true分支
  auto falseBB = BasicBlock::create(module, "falseBB", mainFun);  // false分支
  auto retBB = BasicBlock::create(module, "", mainFun);  // return分支,提前create,以便true分支可以br
  auto br = builder->create_cond_br(cmp, trueBB, falseBB);  // 条件BR

  builder->set_insert_point(trueBB);  // if true; 分支的开始需要SetInsertPoint设置
  builder->create_store(CONST_INT(233), retAlloca); //将整数233存储到返回值的地址中
  builder->create_br(retBB);  // br retBB

  builder->set_insert_point(falseBB);  // if false
  builder->create_store(CONST_INT(0), retAlloca);  //将整数0存储到返回值的地址中
  builder->create_br(retBB);  // br retBB

  builder->set_insert_point(retBB);  // ret分支
  auto retLoad = builder->create_load(retAlloca);  //获取返回值地址中值
  builder->create_ret(retLoad);  //创建ret指令,返回

  std::cout << module->print();
  delete module;
  return 0;
}
结果验证:
输入指令make,编译通过后输入指令./stu_if_generator >if.ll:
内容如下:
define i32 @main() {


label_entry:
  %op0 = alloca i32
  %op1 = alloca float
  store float 0x40163851e0000000, float* %op1
  %op2 = load float, float* %op1
  %op3 = fcmp ugt float %op2,0x3ff0000000000000
  br i1 %op3, label %label_trueBB, label %label_falseBB
label_trueBB:                                                ; preds = %label_entry
  store i32 233, i32* %op0
  br label %label4
label_falseBB:                                                ; preds = %label_entry
  store i32 0, i32* %op0
  br label %label4
label4:                                                ; preds = %label_trueBB, %label_falseBB
  %op5 = load i32, i32* %op0
  ret i32 %op5
}
输入 lli if.ll; echo $?指令进行测试,结果如下:

结果为233,输出正确
创建了4个basicblock,对应关系为:
auto bb = BasicBlock::create(module, "entry", mainFun);对应main函数中的标签label_entryauto trueBB = BasicBlock::create(module, "trueBB", mainFun);对应标签label_trueBBauto falseBB = BasicBlock::create(module, "falseBB", mainFun);对应标签label_falseBBauto retBB = BasicBlock::create(module, "", mainFun);对应标签label4
补充while_generator.cpp
#include "BasicBlock.h"
#include "Constant.h"
#include "Function.h"
#include "IRBuilder.h"
#include "Module.h"
#include "Type.h"

#include <iostream>
#include <memory>

#ifdef DEBUG  // 用于调试信息,大家可以在编译过程中通过" -DDEBUG"来开启这一选项
#define DEBUG_OUTPUT std::cout << __LINE__ << std::endl;  // 输出行号的简单示例
#else
#define DEBUG_OUTPUT
#endif

#define CONST_INT(num) \
    ConstantInt::get(num, module)

#define CONST_FP(num) \
    ConstantFP::get(num, module) // 得到常数值的表示,方便后面多次用到

int main() {


  auto module = new Module("while code");
  auto builder = new IRBuilder(nullptr, module); //该类提供了独立的接口创建各种 IR 指令
  Type *Int32Type = Type::get_int32_type(module);

  // main函数
  auto mainFun = Function::create(FunctionType::get(Int32Type, {

      }),"main", module);
  auto bb = BasicBlock::create(module, "entry", mainFun); //创建BasicBlock
  builder->set_insert_point(bb);  //将当前插入指令点的位置设在bb

  auto retAlloca = builder->create_alloca(Int32Type);   // 在内存中分配返回值的位置

  auto aAlloca=builder->create_alloca(Int32Type); //在内存中分配参数a的位置
  auto iAlloca=builder->create_alloca(Int32Type); //在内存中分配参数i的位置

  builder->create_store(CONST_INT(10), aAlloca);  //将10写入a的地址
  builder->create_store(CONST_INT(0), iAlloca);  //将0写入i的地址


  auto condBB = BasicBlock::create(module, "condBB", mainFun);  // cond分支,用于while循环的判断
  auto trueBB = BasicBlock::create(module, "trueBB", mainFun);    // true分支,条件为真时
  auto retBB = BasicBlock::create(module, "retBB", mainFun);  // ret分支,当循环条件不满足时
  builder->create_br(condBB);

  builder->set_insert_point(condBB); // cond分支判断条件,分支的开始需要SetInsertPoint设置
  auto iLoad = builder->create_load(iAlloca);  //获取i地址中的值
  auto cmp = builder->create_icmp_lt(iLoad, CONST_INT(10));  //判断i是否小于10
  auto br = builder->create_cond_br(cmp, trueBB, retBB);  // 条件BR

  builder->set_insert_point(trueBB);  // if true;
  auto aLoad = builder->create_load(aAlloca);  //从a地址读取a
  iLoad = builder->create_load(iAlloca);  //从i地址读取i
  auto add1=builder->create_iadd(iLoad,CONST_INT(1)); //进行i+1
  builder->create_store(add1, iAlloca); //把i+1的值写入i的地址
  iLoad = builder->create_load(iAlloca); //从i地址读取i
  auto add2=builder->create_iadd(iLoad,aLoad);//进行i+a
  builder->create_store(add2, aAlloca); //把i+a的值写入a的地址
  builder->create_br(condBB);  // br condBB

  builder->set_insert_point(retBB);  // ret分支
  aLoad = builder->create_load(aAlloca);  //从a地址读取a
  builder->create_store(aLoad,retAlloca ); //把a的值写入返回值的地址
  auto retLoad = builder->create_load(retAlloca);  //获取返回值地址中值
  builder->create_ret(retLoad);  //创建ret指令,返回

  std::cout << module->print();
  delete module;
  return 0;
}
结果验证:
输入指令make,编译通过后输入指令./stu_while_generator >while.ll:
内容如下:
define i32 @main() {


label_entry:
  %op0 = alloca i32
  %op1 = alloca i32
  %op2 = alloca i32
  store i32 10, i32* %op1
  store i32 0, i32* %op2
  br label %label_condBB
label_condBB:                                                ; preds = %label_entry, %label_trueBB
  %op3 = load i32, i32* %op2
  %op4 = icmp slt i32 %op3, 10
  br i1 %op4, label %label_trueBB, label %label_retBB
label_trueBB:                                                ; preds = %label_condBB
  %op5 = load i32, i32* %op1
  %op6 = load i32, i32* %op2
  %op7 = add i32 %op6, 1
  store i32 %op7, i32* %op2
  %op8 = load i32, i32* %op2
  %op9 = add i32 %op8, %op5
  store i32 %op9, i32* %op1
  br label %label_condBB
label_retBB:                                                ; preds = %label_condBB
  %op10 = load i32, i32* %op1
  store i32 %op10, i32* %op0
  %op11 = load i32, i32* %op0
  ret i32 %op11
}
输入 lli while.ll; echo $?指令进行测试,结果如下:

结果为65,输出正确
创建了4个basicblock,对应关系为:
auto bb = BasicBlock::create(module, "entry", mainFun);对应main函数中的标签label_entryauto condBB = BasicBlock::create(module, "condBB", mainFun);对应标签label_condBBauto trueBB = BasicBlock::create(module, "trueBB", mainFun);对应标签label_trueBBauto retBB = BasicBlock::create(module, "retBB", mainFun);对应标签label_retBB
问题2: Visitor Pattern
请指出visitor.cpp中,treeVisitor.visit(exprRoot)执行时,以下几个Node的遍历序列:numberA、numberB、exprC、exprD、exprE、numberF、exprRoot。
序列请按如下格式指明:
exprRoot->numberF->exprE->numberA->exprD
答:
对visitor.cpp进行分析:
class AddSubNode : public Node {

        // Specific element class #1
 public:
  // Resolved at runtime, it calls the treeVisitor's overloaded function,
  // corresponding to AddSubNode.
  int accept(TreeVisitor& treeVisitor) override {


    return treeVisitor.visit(*this);
  }
  Node& leftNode;
  Node& rightNode;
  std::string op;
  AddSubNode(Node& left, Node& right, std::string op): leftNode(left), rightNode(right), op(op){

      }
};
对于加减结点,按照“左中右”的顺序为:左操作数(子结点),中间符号(当前结点),右操作数(子结点)。
class NumberNode : public Node {

        // Specific element class #2
 public:
  // Resolved at runtime, it calls the treeVisitor's overloaded function,
  // corresponding to NumberNode.
  int accept(TreeVisitor& treeVisitor) override {


    return treeVisitor.visit(*this);
  }
  int number;
  NumberNode(int number){


    this->number = number;
  }
};
而数字结点仅自身。
class MulDivNode : public Node {

        // Specific element class #3
 public:
  // Resolved at runtime, it calls the treeVisitor's overloaded function,
  // corresponding to MulDivNode.
  int accept(TreeVisitor& treeVisitor) override {


    return treeVisitor.visit(*this);
  }
  Node& leftNode;
  Node& rightNode;
  std::string op;
  MulDivNode(Node& left, Node& right, std::string op): leftNode(left), rightNode(right), op(op){

      }
};
对于乘除结点,按照“左中右”的顺序为:左操作数(子结点),中间符号(当前结点),右操作数(子结点)。
查看 visit 函数代码
int visit(AddSubNode& node) override {


    auto right = node.rightNode.accept(*this);
    auto left = node.leftNode.accept(*this);
    if (node.op == "add") {


      return left + right;
    }
    else {


      return left - right;
    }
  }
对于加减操作,先遍历右子树再遍历左子树,如果操作符是‘add’就进行加操作,否则进行减操作
int visit(MulDivNode& node) override {


    auto left = node.leftNode.accept(*this);
    auto right = node.rightNode.accept(*this);
    if (node.op == "mul") {


      return left * right;
    }
    else {


      return left / right;
    }
  }
};
对于乘除操作,先遍历左子树再遍历右子树,如果操作符是‘mul’进行乘操作,否则进行减操作。
int visit(NumberNode& node) override {
    return node.number;
  }
数字节点直接返回它的值
下面查看main函数
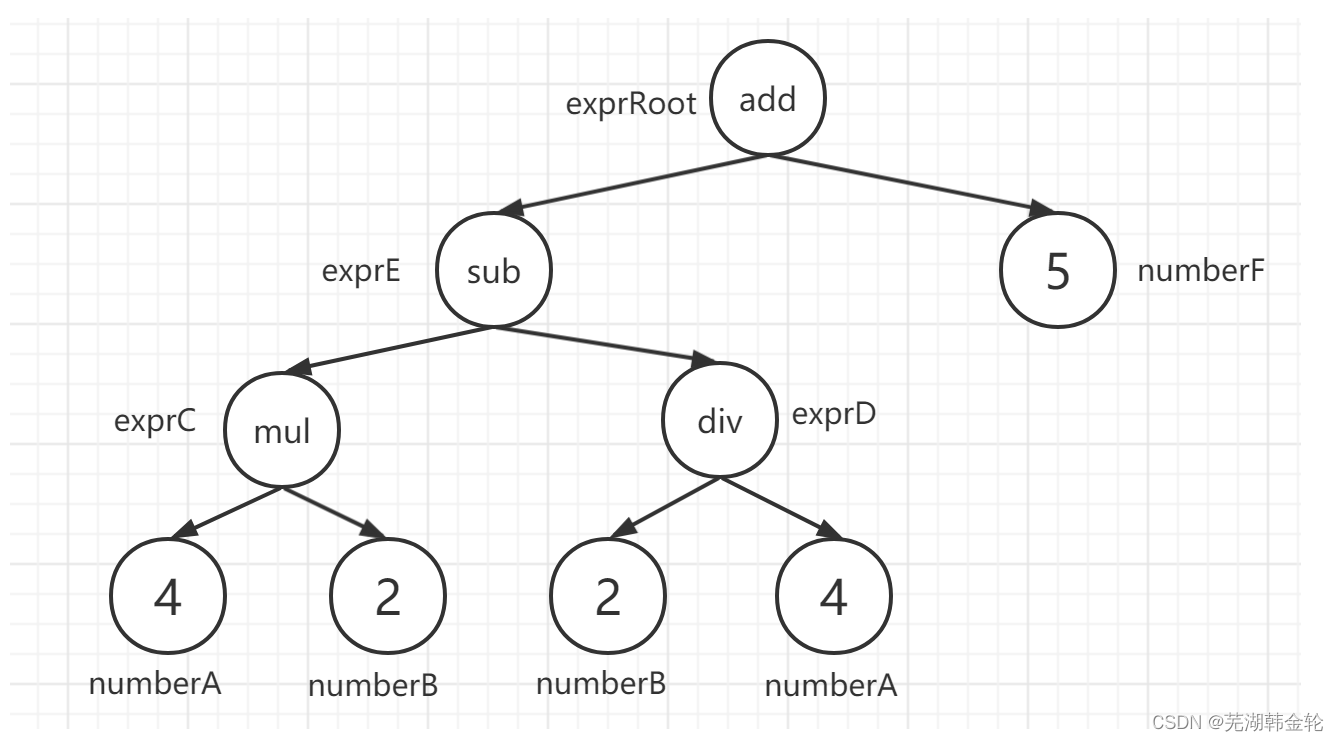
  // construct the expression nodes and the tree
  // the expression: 4 * 2 - 2 / 4 + 5
  auto numberA = NumberNode(4);
  auto numberB = NumberNode(2);
  auto exprC = MulDivNode(numberA, numberB, "mul");
  auto exprD = MulDivNode(numberB, numberA, "div");
  auto exprE = AddSubNode(exprC, exprD, "sub");
  auto numberF = NumberNode(5);
  auto exprRoot = AddSubNode(exprE, numberF, "add");
实际上就自底向上构建了一个树:
然后调用visit函数:
 TreeVisitorCalculator treeVisitor;
  // traverse the tree and calculate
  int result = treeVisitor.visit(exprRoot);
  std::cout << "4 * 2 - 2 / 4 + 5 evaluates: " << result << std::endl;
进入visit函数的具体访问过程如下:
- 根节点 exprRoot 是AddSubNode,按照访问顺序先访问右子树,即numberF
- numberF是NumberNode,直接返回其节点的值5,故开始访问exprRoot的左子树
- 由于exprRoot的第一个左子节点exprE是AddSubNode,所以要遍历完AddSubNode才能返回结果,下面访问exprE的右子树
- exprE的右子节点是exprD,是MulDivNode,所以先访问左子树,即numberB,是NumberNode,返回其值2
- 接着遍历exprD的右子树,即numberA,是NumberNode,返回其值4,得到两个子树的值后将计算结果2/4存在exprD中
- 接着访问exprE的左子树,即exprC,是MulDivNode,所以先遍历左子树,是numberA,是NumberNode,返回其值4
- 接着访问exprC的右子树,即numberB,是NumberNode,返回其值2,接着将运算结果2*4的值存在exprC中
- 得到了exprC的值(值为8)和exprD的值(值为0.5),回到上一层将exprC-exprD的值存入exprE中
- 得到了exprE的值和numberF的值,将exprE+numberF的值存入根节点,遍历结束,最终结果为13(这里有个小细节,计算结果是12.5,但是结果使用int型保存,所以四舍五入为13)
故最终的访问顺序如下:exprRoot->numberF->exprE->exprD->numberB->numberA->exprC->numberA->numberB
问题3: getelementptr
请给出IR.md中提到的两种getelementptr用法的区别,并稍加解释:
%2 = getelementptr [10 x i32], [10 x i32]* %1, i32 0, i32 %0%2 = getelementptr i32, i32* %1 i32 %0
答:
- 概念:
getelementptr指令用于获取数组结构的元素的地址。 它仅执行地址计算,并且不访问内存。 - 格式:
<result> = getelementptr <type>, <type>* <ptrval> [, <type> <idx>] - 参数解释:第一个参数是计算基础类型,第二第三个参数表示索引开始的指针类型及指针,
[]表示可重复参数,里面表示的数组索引的偏移类型及偏移值。
%2 = getelementptr [10 x i32], [10 x i32]* %1, i32 0, i32 %0
下面结合一个例子来说明,这是assign.c
int main(){


  int a[10];
  a[0] = 10;
  a[1] = a[0] * 2;
  return a[1];
}
clang生成的.ll文件如下:
define i32 @main() #0 {


  %1 = alloca i32, align 4
  %2 = alloca [10 x i32], align 16
  store i32 0, i32* %1, align 4
  %3 = getelementptr inbounds [10 x i32], [10 x i32]* %2, i64 0, i64 0
  store i32 10, i32* %3, align 16
  %4 = getelementptr inbounds [10 x i32], [10 x i32]* %2, i64 0, i64 0
  %5 = load i32, i32* %4, align 16
  %6 = mul nsw i32 %5, 2
  %7 = getelementptr inbounds [10 x i32], [10 x i32]* %2, i64 0, i64 1
  store i32 %6, i32* %7, align 4
  %8 = getelementptr inbounds [10 x i32], [10 x i32]* %2, i64 0, i64 1
  %9 = load i32, i32* %8, align 4
  ret i32 %9
}
很明显%3 = getelementptr inbounds [10 x i32], [10 x i32]* %2, i64 0, i64 0这一条语句正是getelementptr用法的第一种,他对应c语言中的取出a[0]的地址空间。再结合上面的参数说明可知,第一种用法的指针的类型为[10 x i32]* ,指向的是数组a[],然后第二个i32 0代表的数组的首地址位置,即a[0],第三个i32 0代表的是从首地址开始的偏移量。即如果是这么表示%2 = getelementptr [20 x i32], [20 x i32]* %1, i32 2, i32 %0 ,即取出a[2+%0]的位置的地址空间赋给%2。
如果是二维数组a[10][10],要想对a[0][1]赋值,首先要得到其位置,用getelementptr表示为:
%3 = getelementptr inbounds [10 x [10 x i32]], [10 x [10 x i32]]* %2, i64 0, i64 0
%4 = getelementptr inbounds [10 x i32], [10 x i32]* %3, i64 0, i64 1
首先取出a[0][]的位置,赋给%3,再从a[0][]取出a[0][1]的位置赋给%4
三维数组以此类推
2.%2 = getelementptr i32, i32* %1 i32 %0
指针类型为i32* ,即int*,如果放在c中就代表一个一维数组的意思。偏移量为%0,也是获得一个数组a[%0]位置的方法
总结:这两种getelementptr实际上是针对不同的指针类型[10 x i32]*和i32*,同样取出a[%0]的方法。
此外,这两种的用法实际上能算作是同一种用法,区别是在于前者是[10 x i32]*型,指针所指向的地址仍旧可以视为指针,从而除指针自身以[10 x i32]为单位的偏移外,还有偏移单位为i32的偏移;而后者是i32*,仅存在i32这一单位的偏移。
而且,这种不仅适用于数组的寻址,也适用于结构体、向量等数据组织方式的寻址,方法和数组的类似。
实验难点
- 在if_hand.ll给
float a = 5.555;赋值。如果直接使用store float 5.555, float* %1会报错。 输入clang -S -emit-llvm if.c指令,看了一下样例,发现要写成浮点数的机器表达形式。 即
5.555的二进制表示:101.10001110000101000111101011100001010001111010111
尾数正规化 :1.0110001110000101000111101011100001010001111010111*22
E=2, exp = E + Bias =129,二进制表示为10000001
符号位为0
有效数字M等于 01100011100001010001111
故5.555的IEEE表示为
0 10000001 01100011100001010001111
转换为十六进制为0x40b1c28f
但样例给出的是0x40163851E0000000,后经验证发现样例给的是double型的IEEE标识,但程序和精简的IR Reference手册都说明了float是单精度的,所以我觉得这里还是有点问题
- 考察两种
getelementptr用法除了查阅精简的IR Reference手册,还可以上网查阅其他资料,最重要的是可以利用clang生成不同的.ll文件进行比较验证
实验反馈
实验我认为最难的地方不在于实验本身,在于环境配置。一开始实验文档说llvm的版本要10.0.1,但是用指令下出来的是6.0版本,我就想先试着用一下先,当编译到fun_hand.ll时会报错,给同学的10.0.1版本的却不会报错,我就以为是llvm版本的问题,然后就下载10.0.1的版本,但是gitee上的方法都没啥用,第一个docker下载好了不懂怎么用,只能用第二个自己搭建的方法,但足足花费了4个小时来编译llvm!
实验本身还是挺有意思的,可以根据案例来仿写其他的,但是有些内容要一直重复写就会很烦,如果有错了找半天都找不到。