react组件进阶
组件通讯介绍
组件是独立且封闭的单元,默认情况下,只能使用组件自己的数据。在组件化过程中,我们将一个完整的功能拆分成多个组件,以更好的完成整个应用的功能。而在这个过程中,多个组件之间不可避免的要共享某些数据。为了实现这些功能,就需要打破组件的独立封闭性,让其与外界沟通。这个过程就是组件通讯。
组件的props
- 组件是封闭的,接收外部数据应该通过props来实现
- props的作用:接收传递给组件的数据
- 接收数据:
- 函数组件通过参数props来接收数据,props是一个对象
- 类组件通过this.props接收数据
- 传递数据:在组件标签上添加属性
函数组件
const Hello = (props) => {


    console.log(props);
    return (
        <div>props:{

      props.name}</div>
    )
}

// 渲染
ReactDOM.render(<Hello name="jack" />, document.getElementById('root'))
批量传递数据:
function Hello(props) {


  const {

      name, age, gender} = props;
  return (
    <h2>{

      name}-{

      age}-{

      gender}</h2>
  )
}

const data = {


  name: 'a',
  age: 19,
  gender: '女'
}

// 批量传递数据。这里的花括号表示内部是js表达式,正常情况下是不能直接写...data的,
// 如console.log(...data)就会报错。在react中允许这样做
ReactDom.render(<Hello {

      ...data} />, document.getElementById('root'));
类组件
class App extends React.Component {


    render() {


        console.log(this.props);
        return (
            <div>
                props: {

      this.props.name}
            </div>
        )
    }
}

// 渲染
ReactDOM.render(<App name="jack" />, document.getElementById('root'))
注意:使用类组件时,如果写了构造函数,应该将props作为参数传递给constructor和super,否则无法在构造函数中通过this获取到props。不过即使没有传递props参数给constructor,在其它地方,比如render方法中,还是可以正常使用this.props的。
技术点:在继承类的构造函数中必须调用super函数,super代表父类的构造函数。ES6 要求,子类的构造函数必须执行一次super函数,否则会报错。但是super函数内的this指向的是当前类的实例。
构造器是否接受 props,是否传递给 super,取决于是否希望在构造器中通过 this访问props。
- 当构造器中接收了props参数,super没有传递props,此时this.props是undefined,当然可以正常使用props(前边不加this)
- 当构造器中接收了props参数,super也传递props,可以通过this.props拿到对象
class App extends React.Component {


  constructor(props) {


    super(props);
  }
  render() {


    // constructor中有没有传递props,和这里没有关系
    return (
        <div>
          props:{

      this.props.name}
        </div>
    )
  }
}
数据类型
- 可以传递给组件任意类型的数据
- props是只读的对象,只能读取属性的值,无法修改对象
import React from 'react'
import ReactDom from 'react-dom'

function Hello(props) {


  console.log(props);
  props.fn();
  return (
      <div>
        <h1>name:{

      props.name}</h1>
        {

      props.tag}
      </div>
  )
}

ReactDom.render(
    <Hello
        name="小明"
        age={

      18} // 如果要传递数字类型,需要使用{}包裹起来
        age2='8'
        colors={

      ['red','green']}
        fn={

      () => {

      console.log('啊啊啊')}} // 可以传递函数
        tag={

      <p>这是一个p标签</p>}         // 可以传递tag标签
    />, document.getElementById('root'));
Props 默认值为 “True”
如果你没给 prop 赋值,它的默认值是 true。以下两个 JSX 表达式是等价的:
<MyTextBox autocomplete />

<MyTextBox autocomplete={

      true} />
props深入
children属性
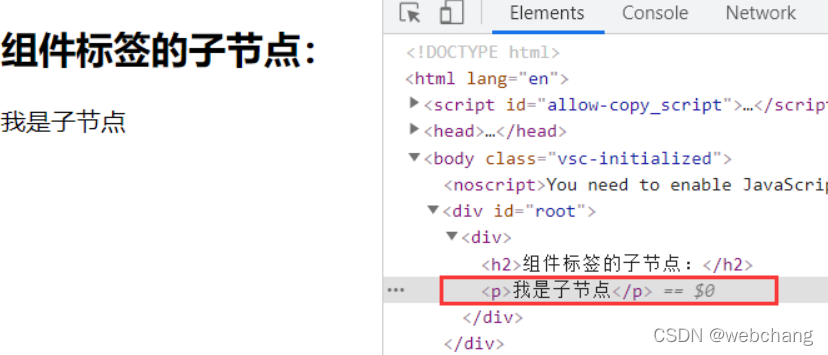
- children属性:表示组件标签的子节点。当组件标签有子节点时,props就会有该属性
- children属性与普通的props一样,值可以是任意值(文本、React元素、组件,甚至是函数)
class App extends React.Component {


  render() {


    console.log(this.props);
    return (
        <div>
          <h2>组件标签的子节点:</h2>
          {

      this.props.children} // 我是子节点
        </div>
    )
  }
}

ReactDom.render(
    <App name="hello">
      <p>我是子节点</p>
    </App>, document.getElementById('root'));
属性展开
如果你已经有了一个 props 对象,你可以使用展开运算符 ... 来在 JSX 中传递整个 props 对象。以下两个组件是等价的:
function App1() {


  return <Greeting firstName="Ben" lastName="Hector" />;
}

function App2() {


  const props = {

      firstName: 'Ben', lastName: 'Hector'};
  return <Greeting {

      ...props} />;
}
你还可以选择只保留当前组件需要接收的 props,并使用展开运算符将其他 props 传递下去。
const Button = props => {


  const {

       kind, ...other } = props;
  const className = kind === "primary" ? "PrimaryButton" : "SecondaryButton";
  return <button className={

      className} {

      ...other} />;
};

const App = () => {


  return (
    <div>
      <Button kind="primary" onClick={

      () => console.log("clicked!")}>
        Hello World!
      </Button>
    </div>
  );
};
在上述例子中,kind 的 prop 会被安全的保留,它将_不会_被传递给 DOM 中的 元素。 所有其他的 props 会通过 ...other 对象传递,使得这个组件的应用可以非常灵活。你可以看到它传递了一个 onClick 和 children 属性。
props校验
- props校验:允许在创建组件的时候,就指定props的类型、格式等
- 作用:捕获使用组件时因为props导致的错误,给出明确的错误提示,增加组件的健壮性
使用步骤
- 安装包prop-types
npm i prop-types - 导入prop-types包
- 使用**组件名.propTypes ={}**来给组件的props添加校验规则
- 校验规则通过PropTypes 对象来指定
约束规则:
- 常见类型: array、bool、func、number、object、string
- React元素类型: element
- 必填项:isRequired
- 自定义特定结构: shape({ )
类组件中props校验的写法
import React from 'react'
import ReactDom from 'react-dom'
import PropTypes from 'prop-types'

class App extends React.Component {


  render() {


    console.log(this.props);
    let arr = this.props.colors;
    let list = arr.map((item, index) => <li key={

      index}>{

      index}-{

      item}</li>)
    return (
        <ul>
          {

      list}
        </ul>
    )
  }
}

// 添加props校验
App.propTypes = {


  colors: PropTypes.array,
  a: PropTypes.number, // 数值类型
  fn: PropTypes.func.isRequired, // 函数func并且必填,注意这里是func
  tag: PropTypes.element, // react元素
  filter: PropTypes.shape({

       // 自定义类型
    area: PropTypes.string,
    price: PropTypes.number
  })
}

// 当没有传递对应的prop时的默认值
App.defaultProps = {


  gender: '保密',
  age: 18
}
上边代码的写法是在类的外部给类加上自定义的属性,如何在类的内部就进行这些操作呢?类的静态属性 指的是 Class 本身的属性,即Class.propName,而不是定义在实例对象(this)上的属性。类的静态属性,写法是在实例属性的前面,加上static关键字。
class App extends React.Component {


  // 添加props校验
  static propTypes = {


    colors: PropTypes.array
  }

// 当没有传递对应的prop时的默认值
  static defaultProps = {


    gender: '保密',
    age: 18
  }

  render() {


    console.log(this.props);
    let arr = this.props.colors;
    let list = arr.map((item, index) => <li key={

      index}>{

      index}-{

      item}</li>)
    return (
        <ul>
          {

      list}
        </ul>
    )
  }
}
函数组件中props校验的写法
由于函数中不能使用static关键字,所以定义props校验的部分只能写在函数组件的外部。
function Hello(props) {


  const {

       name, age, gender } = props;
  return (
    <h2>{

      name}-{

      age}-{

      gender}</h2>
  )
}

// 提供类型限制
Hello.propTypes = {


  name: PropTypes.string.isRequired,
  age: PropTypes.number.isRequired
}

// 当没有传递对应的prop时的默认值
Hello.defaultProps = {


  gender: '保密',
  age: 18
}

const data = {


  name: 'a',
  age: 19
}

ReactDom.render(<Hello {

      ...data} />, document.getElementById('root'));
refs
过时 API:String 类型的 Refs
react之前的 API 中的 ref 属性是string 类型的,例如 “textInput”。可以通过 this.refs.textInput 来访问 DOM 节点。官方不建议使用它,因为 string 类型的 refs 存在 一些问题,效率不高。
class App extends React.Component {


  showData = () => {


    let input = this.refs.input1;
    alert(input.value)
  }

  showData2 = (e) => {


    alert(e.target.value);
  }

  render() {


    return (
      <div>
        <input ref="input1" type="text" />
        <button onClick={

      this.showData}>提示</button>
        <input onBlur={

      this.showData2} type="text" />
      </div>
    )
  }
}
回调refs
class App extends React.Component {


  state = {


    count: 0
  }

  showData = () => {


    let input = this.input1;
    alert(input.value)
  }

  updateCount = () => {


    this.setState({


      count: this.state.count + 1
    })
  }

  render() {


    return (
      <div>
        {

      /* 注意这里的ref是箭头函数,currentNode是当前节点,
        react内部会自动调用,然后将当前节点赋值给this的input1 */}
        <input ref={

      currentNode => {

       this.input1 = currentNode; console.log('--', currentNode) }} type="text" />
        <button onClick={

      this.showData}>提示</button>

        <h1>{

      this.state.count}</h1>
        <button onClick={

      this.updateCount}>更新</button>
      </div>
    )
  }
}
如果 ref 回调函数是以内联函数的方式定义的,在更新过程中它会被执行两次,第一次传入参数 null,然后第二次会传入参数 DOM 元素。这是因为在每次渲染时会创建一个新的函数实例,所以 React 清空旧的 ref 并且设置新的。通过将 ref 的回调函数定义成 class 的绑定函数的方式可以避免上述问题,但是大多数情况下它是无关紧要的。
如图,每次更新时,ref的回调函数会被调用两次
将回调函数改为class的函数方式是这样的:
class App extends React.Component {


  showData = () => {


    let input = this.input1;
    alert(input.value)
  }

  setInputRef = (c) => {


    console.log(c)
    this.input1 = c;
  }

  render() {


    return (
      <div>
        <input ref={

      this.setInputRef} type="text" />
        <button onClick={

      this.showData}>提示</button>
      </div>
    )
  }
}
React.createRef
React.createRef调用后可以返回一个容器,该容器可以存储被ref所标识的节点,该容器是“专人专用”的
class App extends React.Component {


  inputRef = React.createRef();
  inputRef2 = React.createRef();

  showData = () => {


    let input = this.inputRef.current;
    console.log(input.value)
  }

  showData2 = () => {


    console.log(this.inputRef2.current.value)
  }

  render() {


    return (
      <div>
        {

      /* react内部会将当前节点存储到this.inputRef中 */}
        <input ref={

      this.inputRef} type="text" />
        <button onClick={

      this.showData}>提示</button>
        <input onBlur={

      this.showData2} ref={

      this.inputRef2} type="text" />
      </div>
    )
  }
}
组件通讯总结
组件间的关系
- 父子组件:props
- 兄弟组件(非嵌套组件):消息订阅-发布、集中式管理、状态提升
- 祖孙组件(跨级组件):消息订阅-发布、集中式管理、context
- props:
- children props
- render props
- 消息订阅-发布:pubs-sub、event等等
- 集中式管理:redux、dva等等
- context:生产者-消费者模式
父组件传递数据给子组件
- 父组件提供要传递的state数据
- 给子组件标签添加属性,值为state中的数据
- 子组件中通过props接收父组件中传递的数据
本质上和前边讲到的props的使用方式是一样的,只不过换了一种应用方式
class App extends React.Component {


  state = {


    lastName: '老王'
  }

  render() {


    return (
        <div className="parent">
          父组件
          <Child name={

      this.state.lastName} />
        </div>
    )
  }
}

function Child(props) {


  return (
      <div className="child">
        <h1>子组件:{

      props.name}</h1>
      </div>
  )
}

ReactDom.render(<App />, document.getElementById('root'));
子组件传递数据给父组件
思路:利用回调函数,父组件提供回调,子组件调用,将要传递的数据作为回调函数的参数。
- 父组件提供一个回调函数(用于接收数据)
- 将该函数作为属性的值,传递给子组件
- 子组件通过props调用回调函数,将子组件的数据作为参数传递给回调函数
class App extends React.Component {


  state = {


    lastName: '老王',
    childData: ''
  }

  // 1.父组件提供接收子组件数据的回调函数,参数就是子子组件传递过来的数据
  getChildMsg = data => {


    console.log(data)
    this.setState({


      childData: data
    })
  }

  render() {


    return (
        <div className="parent">
          <h3>父组件接收到的数据:{

      this.state.childData}</h3>
          {

      /* 2.在子组件上使用props将回调函数传递进子组件 */}
          <Child getMsg={

      this.getChildMsg}  />
        </div>
    )
  }
}

class Child extends React.Component {


  state = {


    name:'child'
  }

  handleClick = e => {


    // 3.在子组件中调用父组件传递过来的回调函数,将数据作为参数传递进去
    this.props.getMsg(this.state.name);
  }

  render() {


    return (
        <div>
          子组件: <button onClick={

      this.handleClick}>传递数据给父组件</button>
        </div>
    )
  }
}
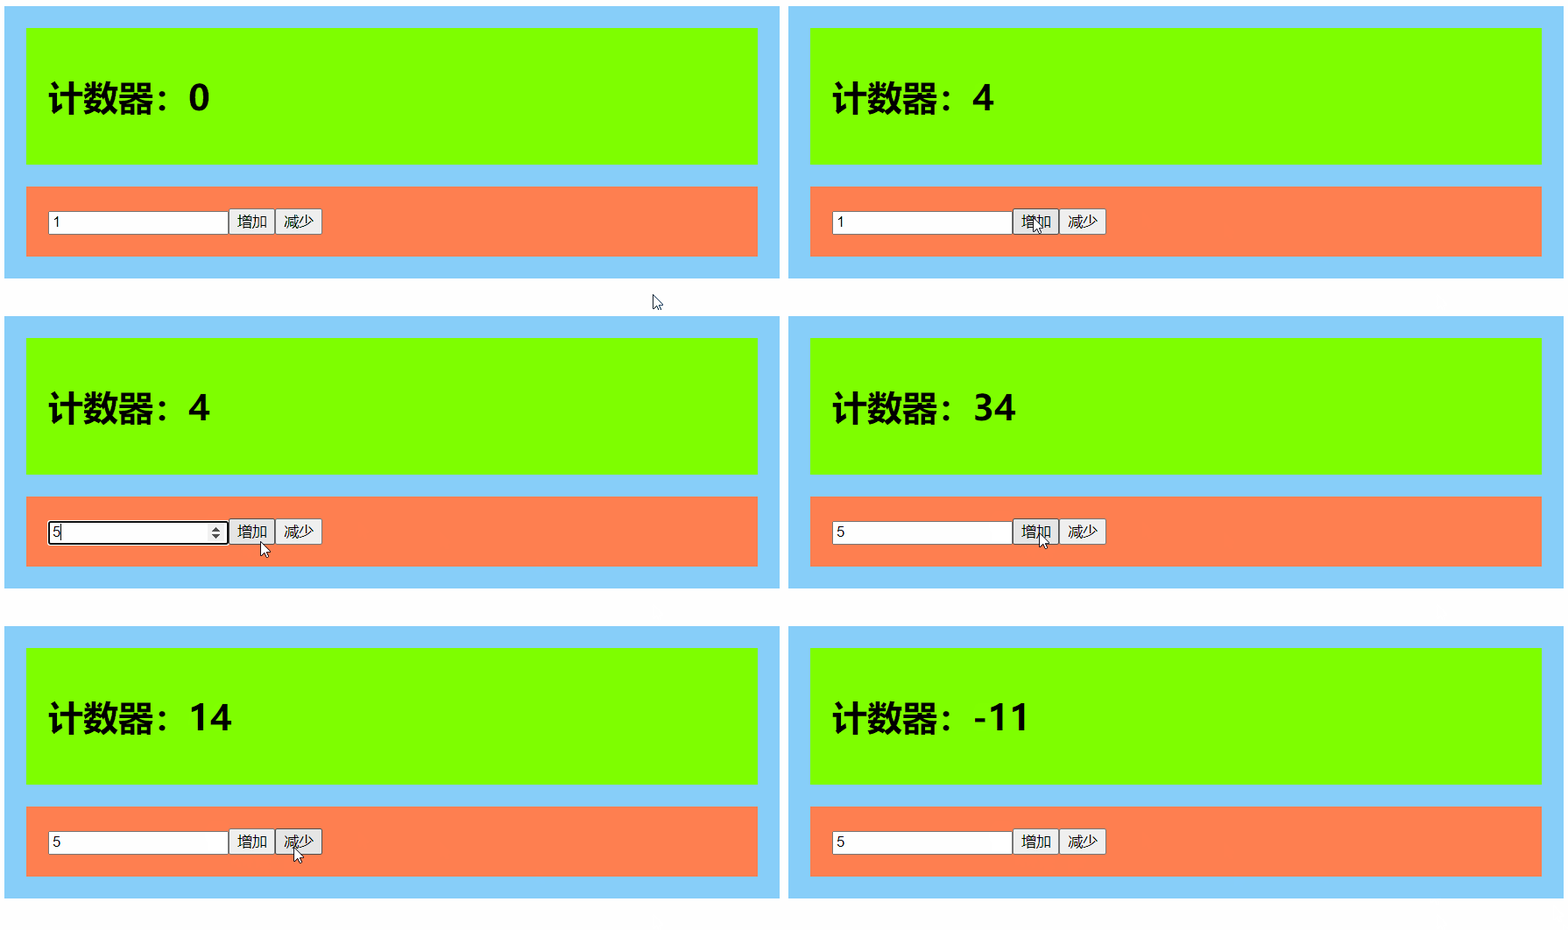
兄弟组件通讯
- 将共享状态提升到最近的公共父组件中,由公共父组件管理这个状态
- 思想︰状态提升
- 公共父组件职责:
- 提供共享状态
- 提供操作共享状态的方法
- 要通讯的子组件只需通过props接收状态或操作状态的方法
class App extends React.Component {


  state = {


    count: 0
  };

  getChildMsg = data => {


    this.setState({


      count: this.state.count + data
    })
  };

  render() {


    return (
        <div className="parent">
          <ChildA count={

      this.state.count}/>
          <ChildB getMsg={

      this.getChildMsg}/>
        </div>
    )
  }
}

class ChildA extends React.Component {


  render() {


    return (
        <div className="childA">
          <h1>计数器:{

      this.props.count}</h1>
        </div>
    )
  }
}

class ChildB extends React.Component {


  state = {


    num: 1
  };

  inputChange = e => {


    this.setState({


      num: parseInt(e.target.value)
    })
  };

  handleNum = e => {


    let type = e.target.dataset.type;
    let num = this.state.num;
    num = type === 'add' ? num : -num;
    this.props.getMsg(num);
  };

  render() {


    return (
        <div className="childB">
          <input type="number" value={

      this.state.num} min="1" onChange={

      this.inputChange}/>
          <button data-type="add" onClick={

      this.handleNum}>增加</button>
          <button data-type="decrease" onClick={

      this.handleNum}>减少</button>
        </div>
    )
  }
}
Context
Context用于跨组件传递数据
如果两个组件是远方亲戚(比如,嵌套多层)可以使用Context实现组件通讯
- 调用React. createContext()创建 Provider(提供数据)和Consumer (消费数据)两个组件。
- 使用Provider组件作为父节点去包裹要传递数据的节点,在Provider组件上设置value属性,表示要传递的数据
- 使用Consumer组件接收数据
import React from 'react'
import ReactDom from 'react-dom'

import './index.css'

// 创建context得到两个组件
const {

      Provider, Consumer} = React.createContext();

// 嵌套关系:App --> Node --> SubNode --> Child
class App extends React.Component {


  render() {


    return (
        <Provider value="hello">
          <div className="app">
            <Node/>
          </div>
        </Provider>

    )
  }
}

const Node = props => {


  return (
      <div className="node">
        <SubNode/>
      </div>
  )
}

const SubNode = props => {


  return (
      <div className="subNode">
        <Child/>
      </div>
  )
}

class Child extends React.Component {


  render() {


    return (
        <div className="child">
          <Consumer>
            {


              // 注意这里是一个函数
              data => <h2>我是子节点:{

      data}</h2>
            }
          </Consumer>
        </div>
    )
  }
}

ReactDom.render(<App/>, document.getElementById('root'));
组件的生命周期
- 组件的生命周期︰组件从被创建到挂载到页面中运行,再到组件不用时卸载的过程
- 生命周期的每个阶段总是伴随着一些方法调用,这些方法就是生命周期的钩子函数。
- 钩子函数的作用:为开发人员在不同阶段操作组件提供了时机。
- 只有类组件才有生命周期。
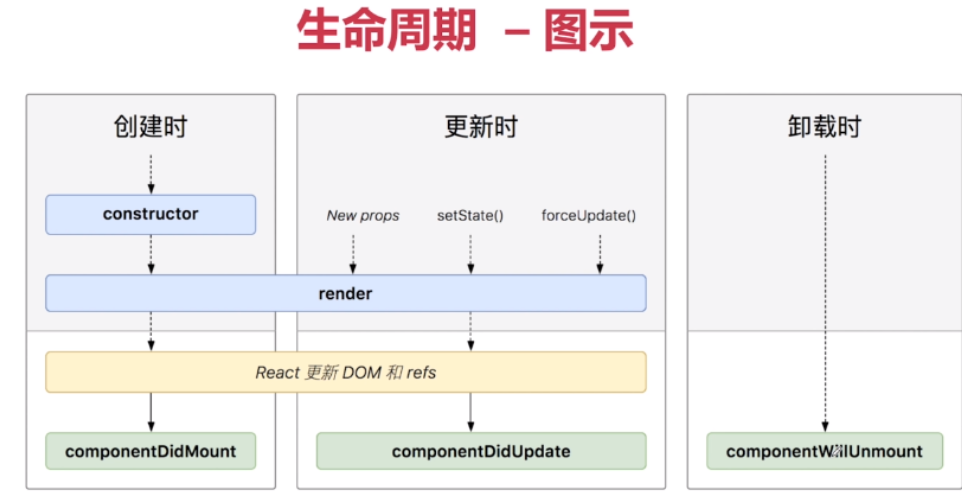
生命周期的三个阶段
- 创建时
- 更新时
- 卸载时
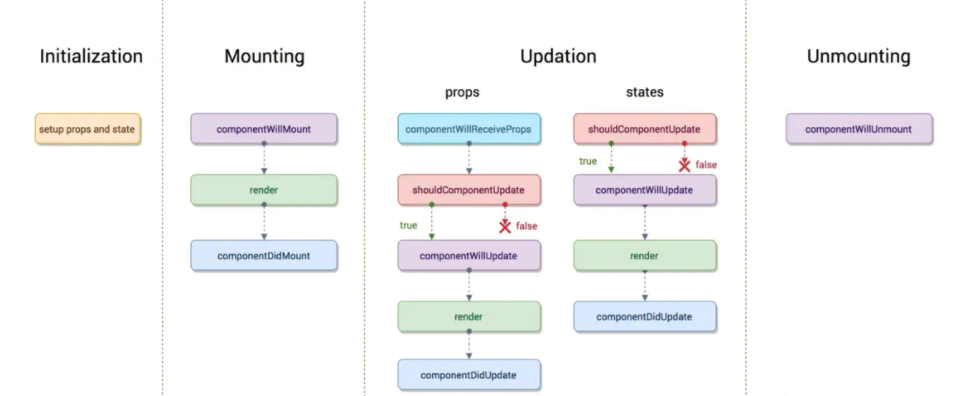
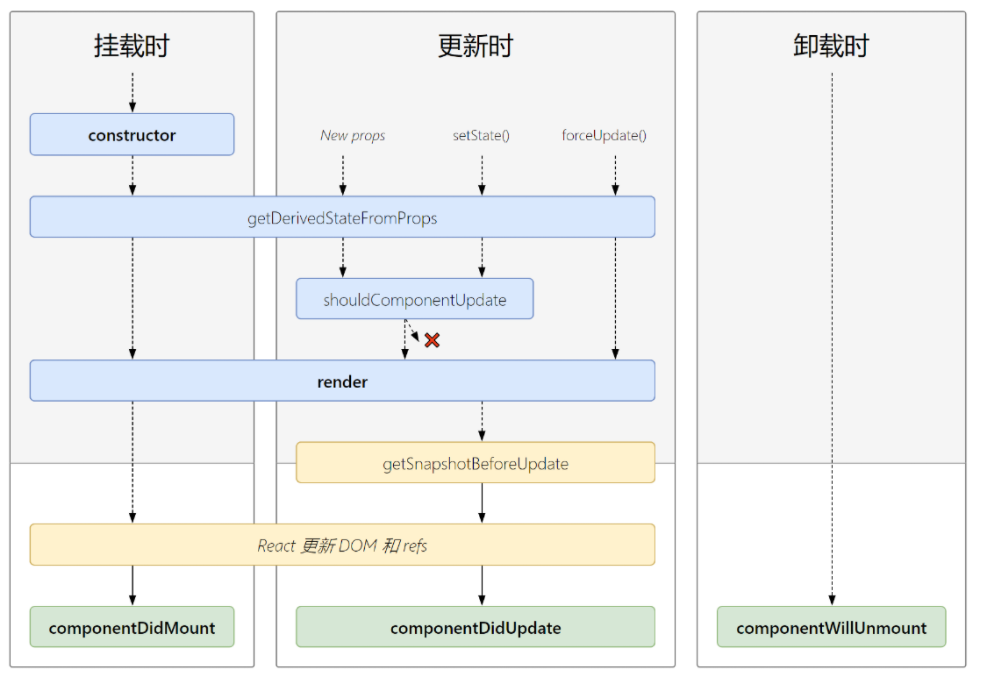
旧版本的生命周期
新版本的生命周期(完整)
重要的勾子
- render:初始化渲染或更新渲染调用
2. componentDidMount:开启监听, 发送ajax请求
3. componentWillUnmount:做一些收尾工作, 如: 清理定时器
即将废弃的勾子
- componentWillMount
2. componentWillReceiveProps
3. componentWillUpdate
现在使用会出现警告,下一个大版本需要加上UNSAFE_前缀才能使用,以后可能会被彻底废弃,不建议使用。
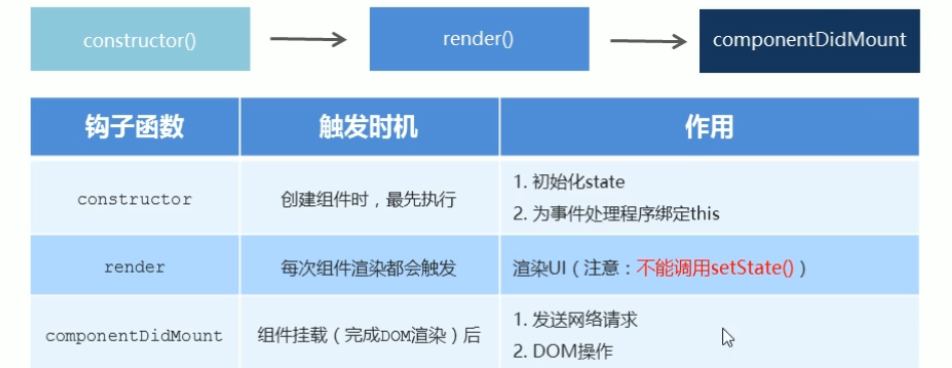
创建时(挂载阶段)
当组件第一次被渲染到 DOM 中的时候,被称为“挂载(mount)”。
执行时机:组件创建时
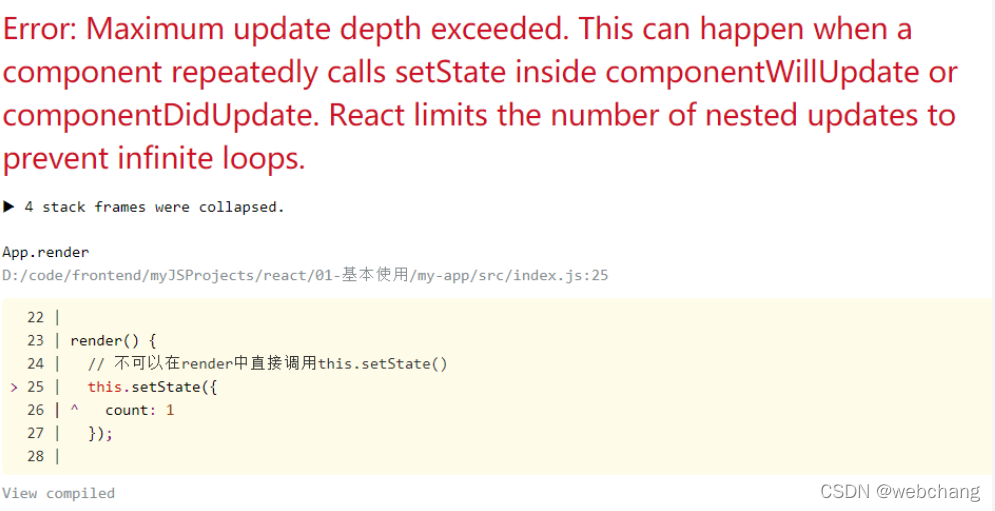
注意不可以在render方法中直接调用setState(),因为setState()可以更新状态,状态更新之后就会触发render方法去渲染UI。如果在render方法中直接调用了setState(),相当于循环调用render方法,最后报错。
componentDidMount:componentDidMount() 方法会在组件已经被渲染到 DOM 中后运行,一般在这个钩子中做一些初始化的事,例如:开启定时器、发送网络请求、订阅消息
可以在 componentDidMount() 里直接调用 setState()。它将触发额外渲染,但此渲染会发生在浏览器更新屏幕之前。如此保证了即使在 render() 两次调用的情况下,用户也不会看到中间状态。请谨慎使用该模式,因为它会导致性能问题。通常,你应该在 constructor() 中初始化 state。如果你的渲染依赖于 DOM 节点的大小或位置,你可以使用此方式处理。
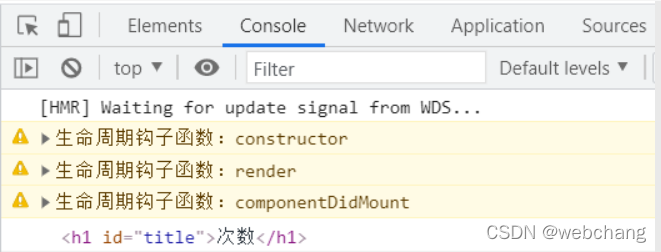
import React from 'react'
import ReactDom from 'react-dom'

class App extends React.Component {


  constructor(props) {


    super(props);
    this.state = {


      count: 0
    };

    // console.warn会打印出一个黄色警告信息
    console.warn('生命周期钩子函数:constructor')
  }

  componentDidMount() {


    // 在componentDidMount可以进行DOM操作了
    console.warn('生命周期钩子函数:componentDidMount')
    let title = document.getElementById('title');
    console.log(title);
  }

  render() {


    // 不可以在render中直接调用this.setState()
    // this.setState({


    //   count: 1
    // });

    console.warn('生命周期钩子函数:render')
    return (
        <div>
          <h1 id="title">次数</h1>
        </div>
    )
  }
}

ReactDom.render(<App />, document.getElementById('root'));
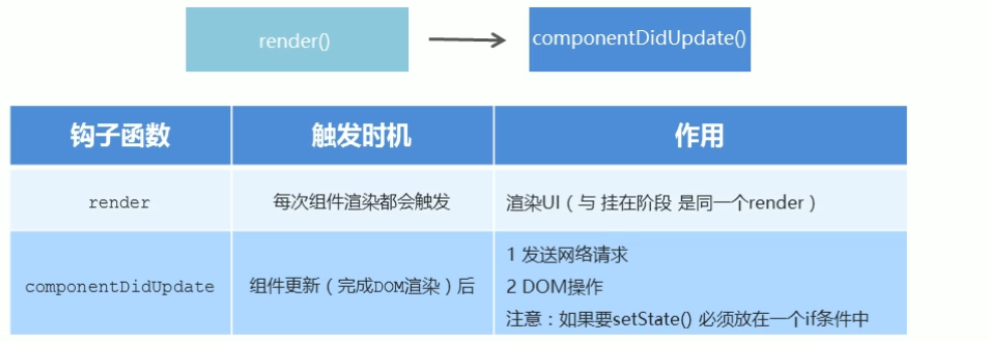
更新时
两个生命周期函数会被调用
- render
- componentDidUpdate
render生命周期函数被触发的三种情况
- 调用setState()方法更新状态
- 对于子组件来说,当prop的值发生变化时,子组件的render方法也会被触发
- 调用forceUpdate()方法。即使组件的状态没有变化,也会被强制更新。子组件的render方法也会被调用
componentDidUpdate
注意:在componentDidUpdate方法中,如果要调用setState()更新状态,必须要放在一个if 条件中。因为如果直接调用setState()更新状态,会触发render(),render执行完成之后又会触发componentDidUpdate,会导致递归更新。
import React from 'react'
import ReactDom from 'react-dom'

class App extends React.Component {


  constructor(props) {


    super(props);
    this.state = {


      count: 0
    };
  }

  handleClick = () => {


    this.setState({


      count: this.state.count + 1
    })
  };

  force = () => {


    this.forceUpdate();
  }

  render() {


    console.log('父组件:render生命周期函数被触发');
    return (
        <div>
          <Counter count={

      this.state.count}/>
          <button onClick={

      this.handleClick}>打豆豆</button>
          <button onClick={

      this.force}>强制更新</button>
        </div>
    )
  }
}

class Counter extends React.Component {


  render() {


    console.log('子组件:render生命周期函数被触发');
    return (
        <div>
          <h1 id="title">豆豆被打的次数:{

      this.props.count}</h1>
        </div>
    );
  }

  // 第一个参数prevProps表示上一次的props
  componentDidUpdate(prevProps, prevState, snapshot) {


    console.log('子组件:componentDidUpdate生命周期函数被触发');
    console.log(prevProps, this.props);

    if (prevProps.count !== this.props.count) {


      this.setState({

      })
    }
    // 可以操作DOM
    let title = document.getElementById('title');
    console.log(title.innerHTML);
  }
}

ReactDom.render(<App/>, document.getElementById('root'));
getSnapshotBeforeUpdate
在更新之前调用,很少用到
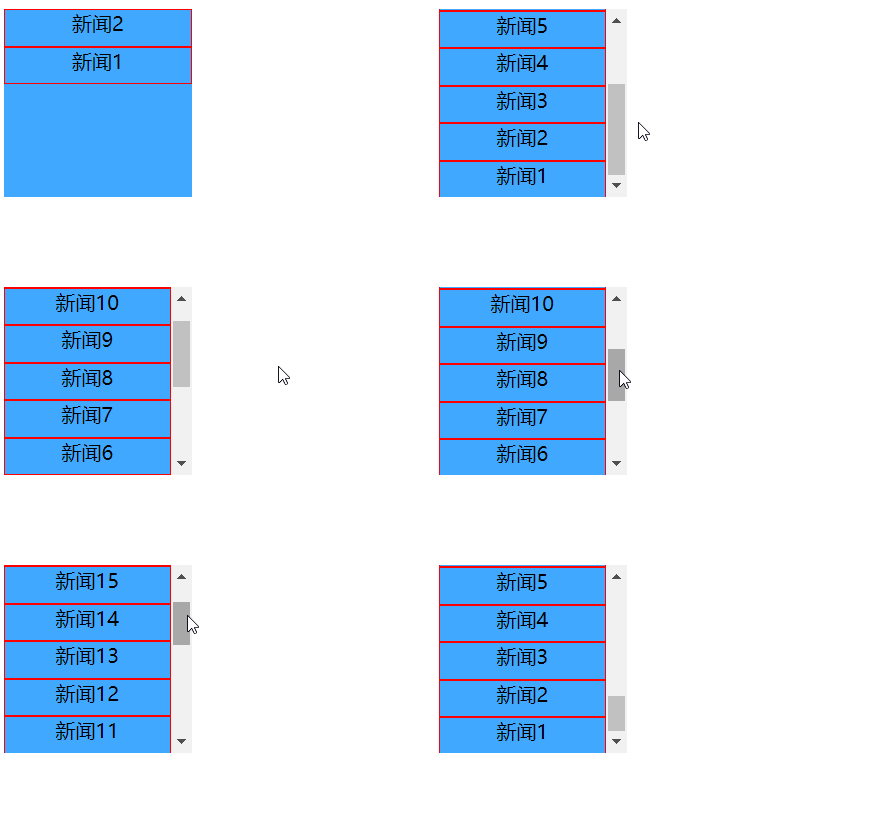
getSnapshotBeforeUpdate() 在最近一次渲染输出(提交到 DOM 节点)之前调用。它使得组件能在发生更改之前从 DOM 中捕获一些信息(例如,滚动位置)。此生命周期方法的任何返回值将作为参数传递给 componentDidUpdate()。
import React from 'react';
import ReactDOM from 'react-dom';
import './index.css'

class News extends React.Component {


  state = {


    newsList: ['新闻1']
  }

  componentDidMount() {


    // 每隔一秒,增加一条新闻数据
    setInterval(() => {


      const newList = this.state.newsList;
      const newsItem = '新闻' + (newList.length + 1);
      newList.unshift(newsItem);
      this.setState({


        newList
      });
    }, 1000)
  }

  getSnapshotBeforeUpdate(prevProps, prevState) {


    return this.listDiv.scrollHeight;
  }

  componentDidUpdate(prevProps, prevState, height) {


    console.log(height,this.listDiv.scrollHeight);
    // 滑动滚动条后,虽然新闻数量不断增多,但是页面可以定位在那个地方
    this.listDiv.scrollTop += this.listDiv.scrollHeight - height;
  }

  render() {


    return (
        <div className="list" ref={

      c => this.listDiv = c}>
          {

      this.state.newsList.map((item,index) => {


            return <div key={

      index} className="news">{

      item}</div>
          })}
        </div>
    )
  }
}

ReactDOM.render(<News/>, document.getElementById('root'));
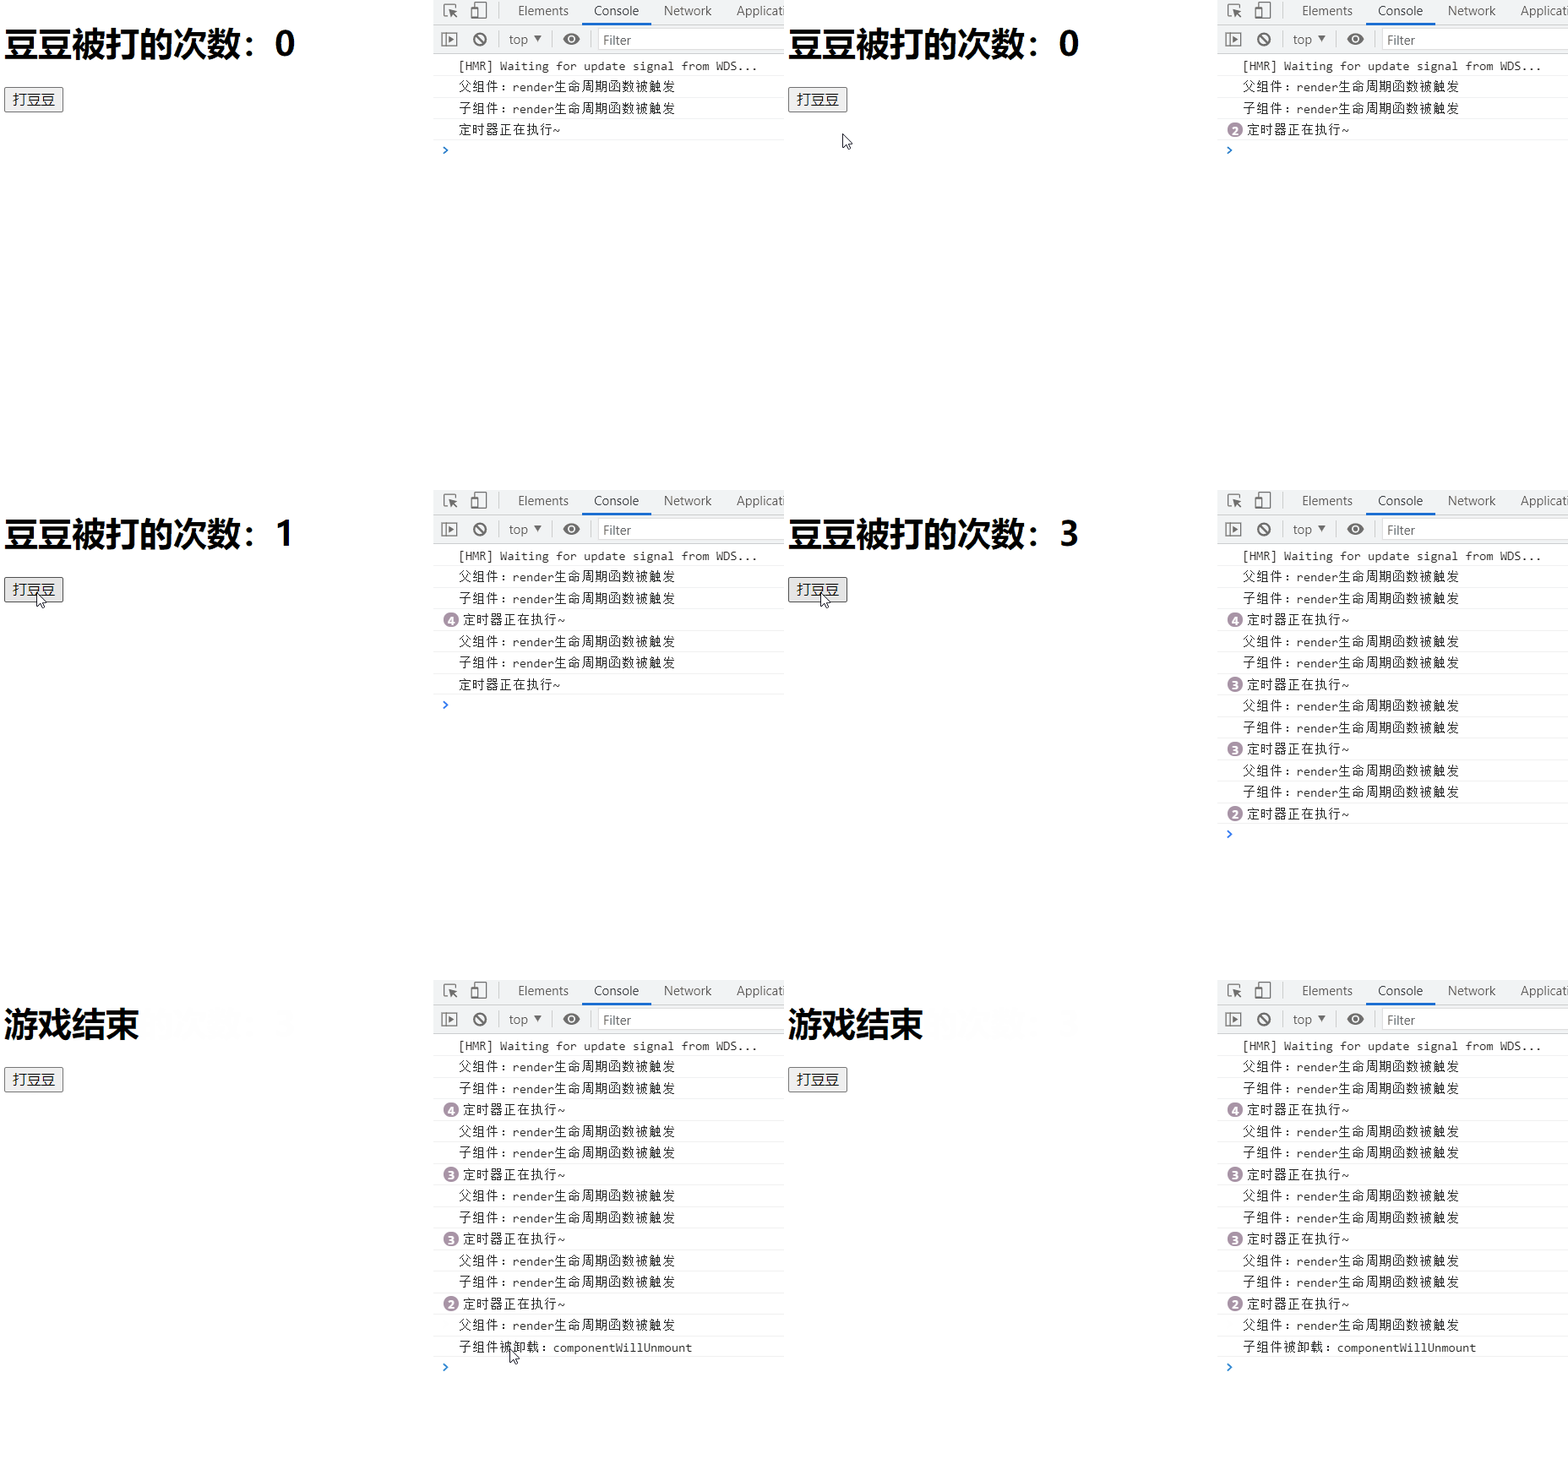
卸载时
class App extends React.Component {


  constructor(props) {


    super(props);
    this.state = {


      count: 0
    };
  }

  handleClick = () => {


    this.setState({


      count: this.state.count + 1
    })
  };

  render() {


    console.log('父组件:render生命周期函数被触发');
    return (
        <div>
          {


            this.state.count > 3 ?
                <h1>游戏结束</h1> : <Counter count={

      this.state.count}/>
          }
          <button onClick={

      this.handleClick}>打豆豆</button>
        </div>
    )
  }
}

class Counter extends React.Component {


  render() {


    console.log('子组件:render生命周期函数被触发');
    return (
        <div>
          <h1 id="title">豆豆被打的次数:{

      this.props.count}</h1>
        </div>
    );
  }

  componentDidMount() {


    // this指向当前组件实例
    this.timerId = setInterval(() => {


      console.log('定时器正在执行~');
    }, 500);
  }

  componentWillUnmount() {


    // this指向当前组件实例
    // 卸载定时器
    clearInterval(this.timerId);
    console.log('子组件被卸载:componentWillUnmount');
  }
}
组件复用和高阶组件
当两个组件有相同功能时就可以使用高阶组件复用。复用什么?
- state
- state的方法(组件状态逻辑)
复用的两种方式
- render props模式
- 高阶组件(HOC)
注意这两种方式不是新的api,而是利用React自身特点的编码技巧演化而成的一种模式(写法)
- 高阶组件通过包装组件,增强组件功能,实现状态逻辑复用。采用包装(装饰器)模式
- 高阶组件( HOC,Higher-OrderComponent )是一个函数,接收要包装的组件,返回增强后的组件。
- 高阶组件内部创建一个类组件,在这个类组件中提供复用的状态逻辑代码,通过prop将复用的状态传递给被包装组件WrappedComponent
使用步骤
- 创建一个函数,名称约定以with开头
- 指定函数参数,参数应该以大写字母开头(作为要渲染的组件)
- 在函数内部创建一个类组件,提供复用的状态逻辑代码,并返回该类组件
- 在该类组件中,渲染参数组件,同时将状态通过prop传递给参数组件
- 调用该高阶组件,传入要增强的组件,通过返回值拿到增强后的组件,并将其渲染到页面中
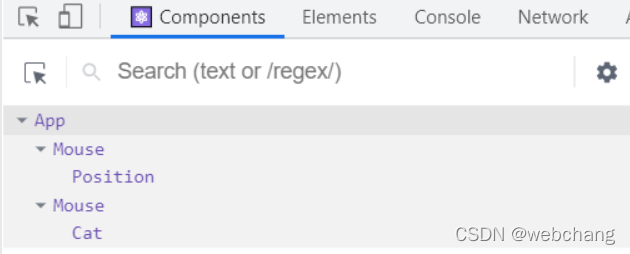
设置displayName
- 使用高阶组件存在的问题︰得到的两个组件名称相同
- 原因︰默认情况下,React使用组件名称作为displayName
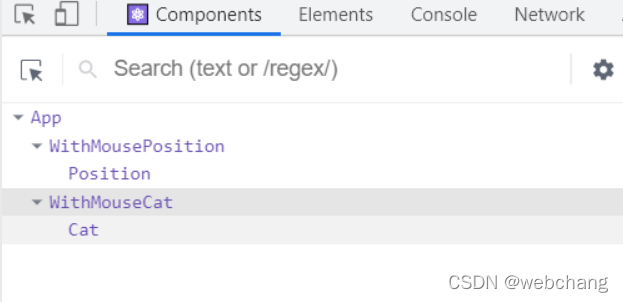
- 解决方式:为高阶组件设置displayName 便于调试时区分不同的组件
- displayName的作用:用于设置调试信息.( React Developer Tools信息)
设置displayName前
设置displayName后
import React from 'react'
import ReactDom from 'react-dom'

import img from './images/cat.png'

// 创建高阶组件
function withMouse(WrappedComponent) {


  // 该类组件提供复用的状态逻辑
  class Mouse extends React.Component {


    state = {


      x: 0,
      y: 0
    };

    handleMouseMove = e => {


      this.setState({


        x: e.clientX,
        y: e.clientY
      });
    };

    componentDidMount() {


      window.addEventListener('mousemove', this.handleMouseMove);
    }

    componentWillUnmount() {


      window.removeEventListener('mousemove', this.handleMouseMove);
    }

    render() {


      // 这里也要传递props,否则会造成props丢失问题
      return <WrappedComponent {

      ...this.state} {

      ...this.props}></WrappedComponent>
    }
  }

  // 设置displayName,给它们加上WithMouse前缀表示它们都是这个高阶组件创建出来的
  Mouse.displayName = `WithMouse${

        getDisplayName(WrappedComponent)}`;

  return Mouse;
}

function getDisplayName(WrappedComponent) {


  return WrappedComponent.displayName || WrappedComponent.name || 'Component';
}

// 测试高阶组件
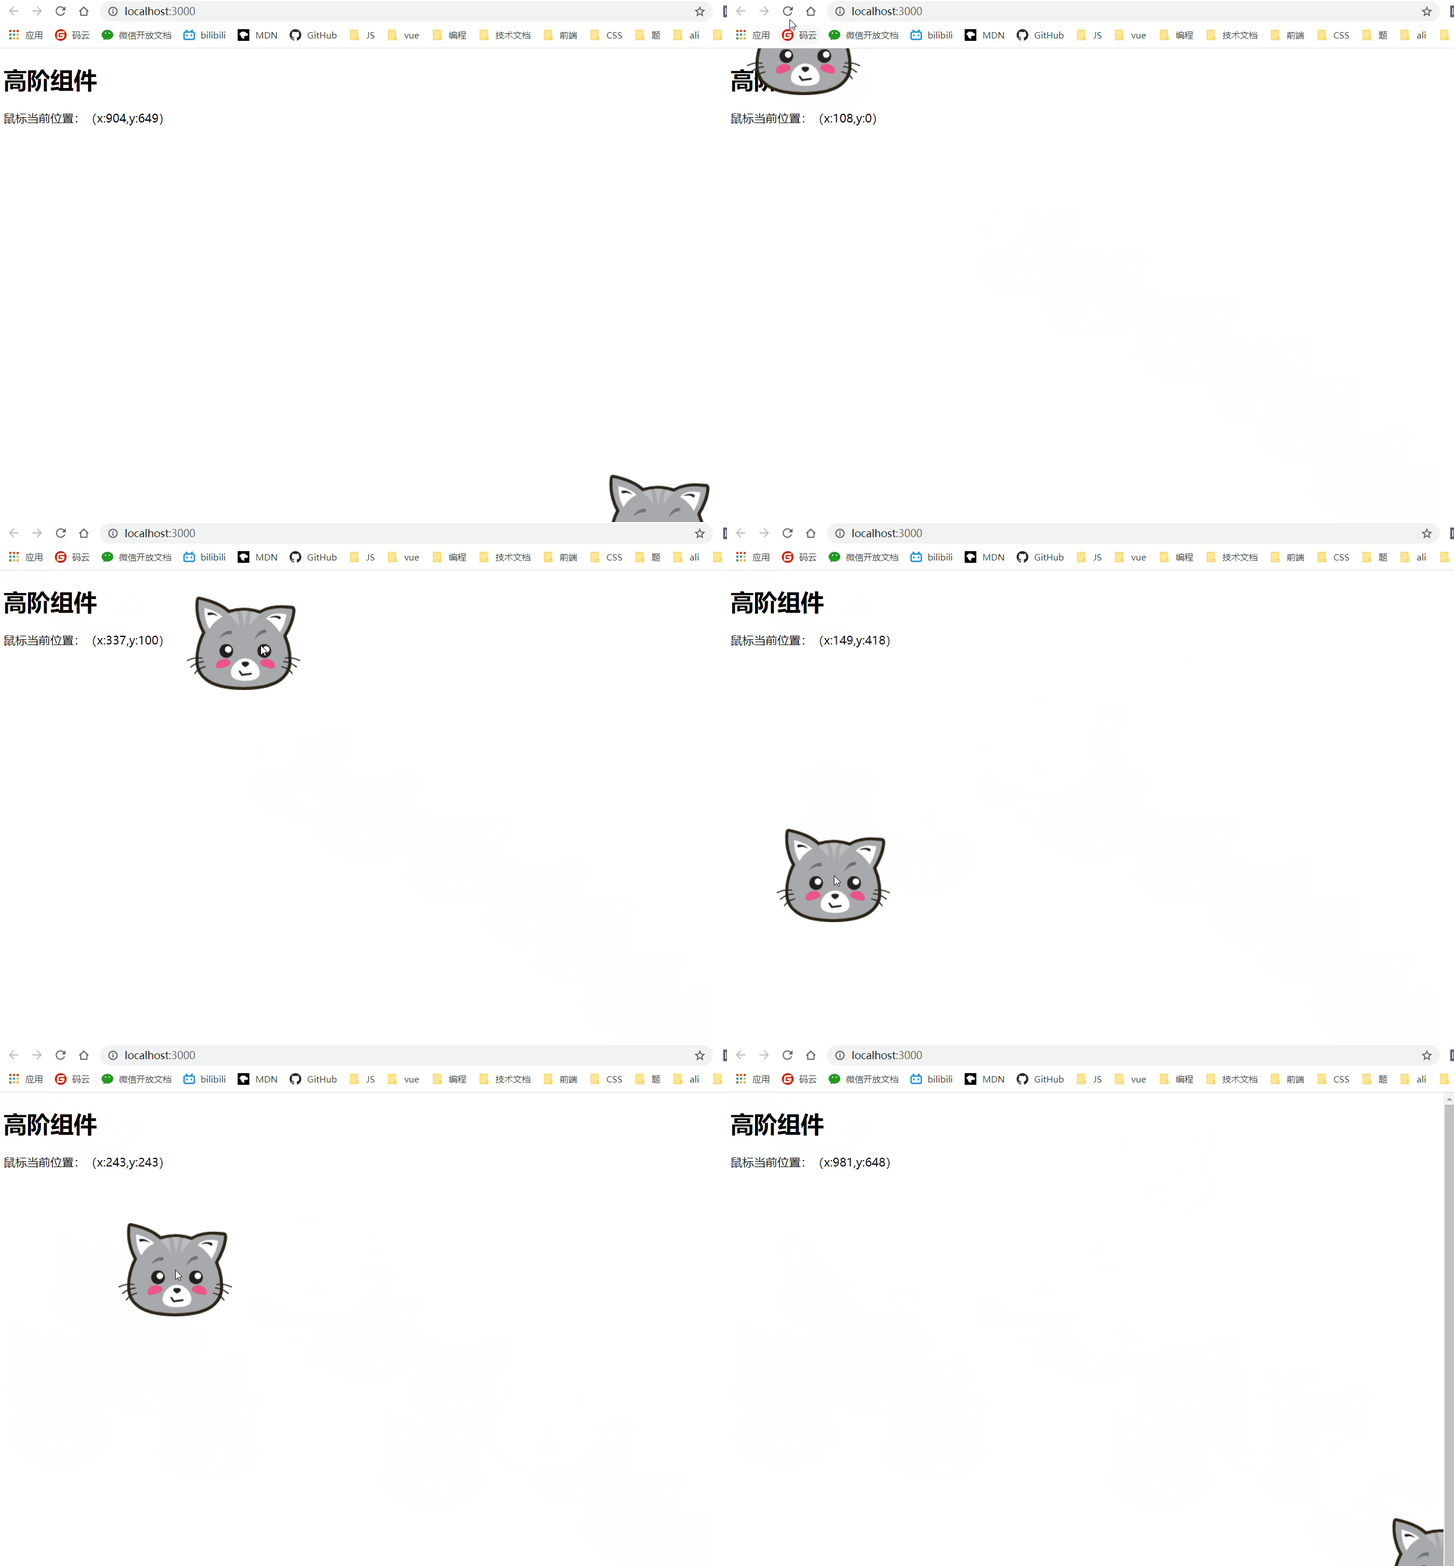
// Position组件原来是没有获取鼠标位置的功能的,通过创建高阶组件可以给它添加上这个功能
const Position = props => {


  console.log(props);
  return (
      <p>鼠标当前位置:(x:{

      props.x},y:{

      props.y})</p>
  )
};

// 跟随鼠标移动的猫
const Cat = props => (
    <img src={

      img} style={

      {


      position: 'absolute',
      top: props.y - 64,
      left: props.x - 77.5
    }}/>
);

const MousePosition = withMouse(Position);
const MouseCat = withMouse(Cat);

class App extends React.Component {


  render() {


    return (
        <div>
          <h1>高阶组件</h1>
          <MousePosition a="1" />
          <MouseCat />
        </div>
    )
  }
}


ReactDom.render(<App/>, document.getElementById('root'));
前端学习交流QQ群,群内学习讨论的氛围很好,大佬云集,期待你的加入:862748629
