我们将在Springboot框架中分别测试EhCache和Redis两种缓存技术。
一、Springboot开启默认缓存。
1. 创建Springboot工程,添加一些必要的依赖。
<dependency>
    <groupId>com.google.code.gson</groupId>
    <artifactId>gson</artifactId>
    <version>2.8.6</version>
</dependency>
<dependency>
    <groupId>org.projectlombok</groupId>
    <artifactId>lombok</artifactId>
    <version>1.18.16</version>
</dependency>
<dependency>
    <groupId>junit</groupId>
    <artifactId>junit</artifactId>
    <version>4.13.1</version>
</dependency>
2. 启动类上面添加@EnableCaching,开启缓存。
package com.chris.cache;

import org.springframework.boot.SpringApplication;
import org.springframework.boot.autoconfigure.SpringBootApplication;
import org.springframework.cache.annotation.EnableCaching;

@EnableCaching
@SpringBootApplication
public class EhcacheApplication {

    public static void main(String[] args) {
        SpringApplication.run(EhcacheApplication.class, args);
    }

}
3. 创建一个数据类,用以处理数据。
package com.chris.cache;

import lombok.AllArgsConstructor;
import lombok.Data;
import lombok.NoArgsConstructor;

import java.io.Serializable;

@Data
@NoArgsConstructor
@AllArgsConstructor
public class UserModel implements Serializable {
    private int id;
    private String name;
    private int age;
    private String address;
}
4. 创建controller类,用以测试。
package com.chris.cache;

import org.springframework.beans.factory.annotation.Autowired;
import org.springframework.cache.CacheManager;
import org.springframework.cache.annotation.CacheEvict;
import org.springframework.cache.annotation.CachePut;
import org.springframework.cache.annotation.Cacheable;
import org.springframework.web.bind.annotation.GetMapping;
import org.springframework.web.bind.annotation.RequestMapping;
import org.springframework.web.bind.annotation.RestController;

import java.util.ArrayList;
import java.util.List;

/**
 * @author Chris Chan
 * Create on 2021/5/5 0:11
 * Use for:
 * Explain:
 * @link . https://my.oschina.net/u/2474629/blog/4868878
 */
@RestController
@RequestMapping("api/test")
public class EhCacheController {
    @Autowired
    CacheManager cacheManager;
    /**
     * 缓存
     * 固定key
     *
     * @return
     */
    @GetMapping("list")
    @Cacheable(cacheNames = "user_model", key = "'list_all'")
    public List<UserModel> list() {
        List<UserModel> userModelList = new ArrayList<>(16);
        userModelList.add(new UserModel(1, "Chris", 40, "中国上海"));
        userModelList.add(new UserModel(2, "Marry", 20, "中国北京"));
        userModelList.add(new UserModel(3, "Mike", 30, "中国广州"));
        System.out.println("从数据库获取用户列表");
        return userModelList;
    }

    /**
     * 缓存
     * 固定key
     *
     * @param id
     * @return
     */
    @GetMapping("find")
    @Cacheable(cacheNames = "user_model", key = "'find_1'")
    public UserModel find(int id) {
        UserModel userModel = new UserModel(1, "Chris", 40, "中国上海");
        System.out.println("从数据库获取用户");
        return userModel;
    }

    /**
     * 缓存
     * 依照不同的请求参数进行缓存
     * 相同参数读缓存,不同参数再缓存
     *
     * @param id
     * @return
     */
    @GetMapping("findById")
    @Cacheable(cacheNames = "user_model", key = "#id")
    public UserModel findById(int id) {
        UserModel userModel = new UserModel(id, "Chris", 40, "中国上海");
        System.out.println("从数据库获取用户:" + id);
        return userModel;
    }

    /**
     * 修改缓存
     * 调用这个方法,无论如何都会将结果写缓存
     *
     * @param id
     * @return
     */
    @GetMapping("update")
    @CachePut(cacheNames = "user_model", key = "#id")
    public UserModel update(int id) {
        UserModel userModel = new UserModel(id, "Kalychen", 40, "中国北京");
        System.out.println("修改用户:" + id);
        return userModel;
    }

    /**
     * 删除缓存
     * 调用删除key匹配的缓存
     *
     * @param id
     * @return
     */
    @GetMapping("delete")
    @CacheEvict(cacheNames = "user_model", key = "#id")
    public String delete(int id) {
        System.out.println("从缓存删除用户:" + id);
        return "Delete User " + id + " success.";
    }
}
yml配置文件没有特别的设置。
5. 测试。
分别调用上述四个接口,从后台打印的信息可以看出是否读取了缓存。
如果打印了信息,表示方法被执行,接口模拟了从数据库查询的过程,否则没有执行查询,而是从缓存读取了需要的数据。
@Cacheable(cacheNames = "user_model", key = "#id") 查询语句一般使用这个注解处理,在第一次使用的时候会执行数据库查询,并把返回结果写入缓存。后续调用优先从缓存中读取,命中则不查询,直接返回。
@CachePut(cacheNames = "user_model", key = "#id") 写入缓存,增加和修改数据一般使用这个注解,无论有无缓存都会去操作数据库,并把返回结果写入缓存。如果有相同key则更新,以保证下次查询获取的是最新的数据。所以方法最后一定要返回完整的数据,向数据库添加数据时可能需要查询一次,以便获得正确的id,不过也可以在增加时使用缓存删除注解,在下一次有查询请求时自动缓存,这样做最好。更新操作可以把更新前的数据直接返回,不需要查询。
@CacheEvict(cacheNames = "user_model", key = "#id") 删除缓存,在删除数据库数据的时候一定要使用这个注解,否则请求结果与数据库就不一致了。
key和condition的构建请参考SpEl表达式。
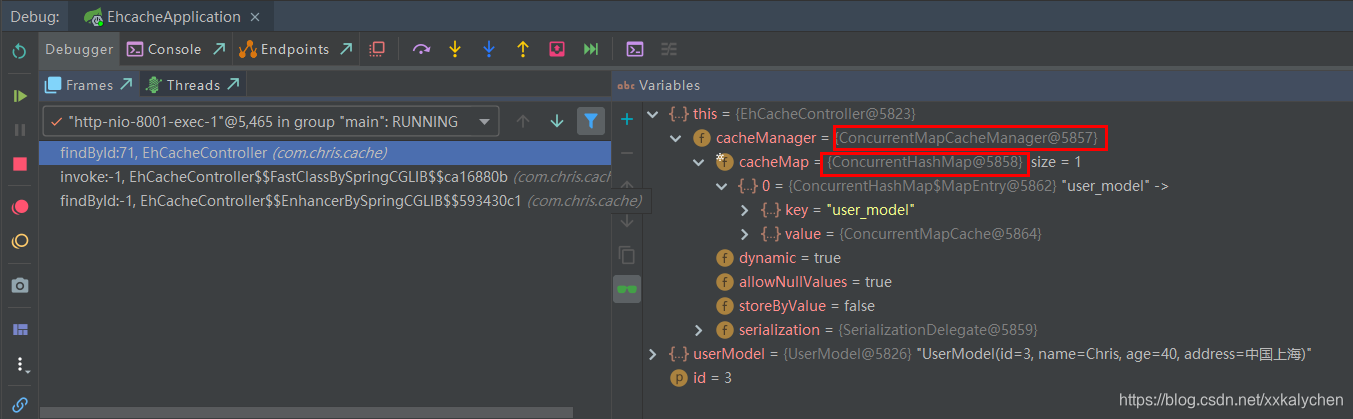
6. 特别说明。
以上设置,Springboot使用的是默认的缓存管理器ConcurrentMapCacheManager,内部使用一个ConcurrentHashMap来管理缓存数据的。在上述控制层定义的cacheManager;就是用来观察的。通过断点调试可以看出当前使用的缓存技术。
二、Springboot集成EhCache缓存框架。
不用再新创建工程,就在原来的工程上面做一点改动即可。
1. 新增依赖。
<!--Spring Boot应用程序提供缓存支持-->
<dependency>
    <groupId>org.springframework.boot</groupId>
    <artifactId>spring-boot-starter-cache</artifactId>
</dependency>
<!--Ehcache缓存实现-->
<dependency>
    <groupId>net.sf.ehcache</groupId>
    <artifactId>ehcache</artifactId>
</dependency>
<!--JSR-107缓存规范-->
<dependency>
    <groupId>javax.cache</groupId>
    <artifactId>cache-api</artifactId>
</dependency>
cache-api的作用没有去测试。也不知道去掉之后有没有影响。此次不关注。
2. 在resources/config下创建ehcache.xml配置文件。
<?xml version="1.0" encoding="UTF-8"?>
<ehcache name="myEncache">

    <diskStore path="G:/home/Tmp_Ehcache"/>

    <defaultCache
            eternal="false"
            maxElementsInMemory="1000"
            overflowToDisk="false"
            diskPersistent="false"
            timeToIdleSeconds="0"
            timeToLiveSeconds="600"
            memoryStoreEvictionPolicy="LRU"
    />
    <cache
            name="user_model"
            eternal="false"
            maxElementsInMemory="100"
            overflowToDisk="false"
            diskPersistent="false"
            timeToIdleSeconds="0"
            timeToLiveSeconds="300"
            memoryStoreEvictionPolicy="LRU"
    />

</ehcache>
具体设置参考相关文档。其中user_model是我们创建好用以测试的缓存。
3. application.yml增加相关配置。
server:
    port: 8001
spring:
    application:
        name: springboot-cache-ehcache-demo-20210505
    cache:
        ehcache:
            config: classpath:/config/ehcache.xml
主要是指明ehcache.xml的位置。
4. 测试。
测试方法同上。但是我们不知道系统当前到底是用了哪种缓存技术。于是,依然是采用断点调试的方式,观察cacheManager。
上图是我在请求过一次之后,第二次更换参数请求的截图。因为再次请求不更换参数的话,数据直接读缓存了,断点的位置就到不了。
可以看出来,cacheManager已经更换为EhCacheCacheManager了,可知当前使用的是EhCache缓存技术。不过我们发现,原来EhCache内部也是使用ConcurrentHashMap来管理缓存数据的。默认的缓存模式和EhCache都是在本地内存中存放数据的。
三、Springboot使用Redis缓存技术。
本地缓存不但消耗本地内存,也无法应用到分布式场景中。所以有一定规模的项目还是大多采用Redis缓存。
仍然是对以上项目做一点修改就好了。这次修改更简单,因为不需要EhCache那样的专门的xml配置文件。
1. 添加依赖。
<dependency>
    <groupId>org.springframework.boot</groupId>
    <artifactId>spring-boot-starter-data-redis</artifactId>
</dependency>
这是Springboot封装好的实现。
2. application.yml修改。
server:
    port: 8001
spring:
    application:
        name: springboot-cache-ehcache-demo-20210505
    redis:
      host: dev.chris.com
      port: 6379
      database: 1
EhCache的设置就不要了,相关依赖包也可以清理掉。
3. 测试。
这就改完了,依计而行,观察cacheManager。不过,你确定你的Redis服务器在工作吗?
依然是更换参数请求两次,当前管理器的确已经被更换为RedisCacheManager了。~~他们都超爱ConcurrentHashMap。
我们这时可以看看Redis。
我们调用的是findById这个接口,缓存中缓存了两次的数据,以id为key。
将项目重启,再调用一次接口请求,获取这两个id的数据,观察后台,并没有打印"从数据库获取用户"的字符串,表明数据还是从Redis缓存中获取的。
附加一个RedisCacheManager的配置。
package com.chris.cache;

import com.fasterxml.jackson.annotation.JsonAutoDetect;
import com.fasterxml.jackson.annotation.JsonTypeInfo;
import com.fasterxml.jackson.annotation.PropertyAccessor;
import com.fasterxml.jackson.databind.ObjectMapper;
import com.fasterxml.jackson.databind.jsontype.impl.LaissezFaireSubTypeValidator;
import org.springframework.context.annotation.Bean;
import org.springframework.context.annotation.Configuration;
import org.springframework.data.redis.cache.RedisCacheConfiguration;
import org.springframework.data.redis.cache.RedisCacheManager;
import org.springframework.data.redis.connection.RedisConnectionFactory;
import org.springframework.data.redis.serializer.Jackson2JsonRedisSerializer;
import org.springframework.data.redis.serializer.RedisSerializationContext;
import org.springframework.data.redis.serializer.RedisSerializer;
import org.springframework.data.redis.serializer.StringRedisSerializer;

import java.time.Duration;
import java.util.HashMap;
import java.util.HashSet;
import java.util.Map;
import java.util.Set;

/**
 * @author Chris Chan
 * Create on 2021/5/5 3:50
 * Use for:
 * Explain:
 */
@Configuration
public class RedisCacheConfig {
    /**
     * 需要好好研究
     *
     * @param factory
     * @return
     */
    @Bean
    public RedisCacheManager cacheManager(RedisConnectionFactory factory) {

        RedisSerializer<String> redisSerializer = new StringRedisSerializer();
        Jackson2JsonRedisSerializer jackson2JsonRedisSerializer = new Jackson2JsonRedisSerializer(Object.class);

        //解决查询缓存转换异常的问题
        ObjectMapper om = new ObjectMapper();
        om.setVisibility(PropertyAccessor.ALL, JsonAutoDetect.Visibility.ANY);
        //om.enableDefaultTyping(ObjectMapper.DefaultTyping.NON_FINAL);
        om.activateDefaultTyping(LaissezFaireSubTypeValidator.instance, ObjectMapper.DefaultTyping.NON_FINAL, JsonTypeInfo.As.WRAPPER_ARRAY);

        jackson2JsonRedisSerializer.setObjectMapper(om);

        //配置序列化(解决乱码的问题)
        RedisCacheConfiguration config = RedisCacheConfiguration.defaultCacheConfig()
//                .entryTtl(Duration.ZERO)
                .entryTtl(Duration.ofSeconds(15L))      //设置默认缓存15秒
                .serializeKeysWith(RedisSerializationContext.SerializationPair.fromSerializer(redisSerializer))
                .serializeValuesWith(RedisSerializationContext.SerializationPair.fromSerializer(jackson2JsonRedisSerializer))
                .disableCachingNullValues();

        Set<String> cacheNames = new HashSet<>();
        cacheNames.add("user_model");

        // 对每个缓存空间应用不同的配置
        Map<String, RedisCacheConfiguration> configMap = new HashMap<>();
        configMap.put("user_model", config.entryTtl(Duration.ofSeconds(60L))); //这个缓存空间60秒

        RedisCacheManager cacheManager = RedisCacheManager.builder(factory)
                .cacheDefaults(config)
                .initialCacheNames(cacheNames)// 注意这两句的调用顺序,一定要先调用该方法设置初始化的缓存名,再初始化相关的配置
                .withInitialCacheConfigurations(configMap)
                .build();
        return cacheManager;
    }
}
有了这个配置,缓存数据存入Redis会被序列化为json数据,直接可读。而且,也可以将需要的缓存设置过期时间。